

Tool Restoration
Megapost
Bailey Plane No. 5 Restoration - Part 1
GBS October 09, 2022
━━━━━━━━━━━━━━━━━━━━
STANLEY BAILEY NO. 5 TYPE 11
MADE BETWEEN 1910 AND 1918
THE JACK OF ALL TRADES PLANE
━━━━━━━━━━━━━━━━━━━━
Sometimes restoring a tool isn't about making it look new, it's about preparing it for another hundred years of work.
This is exciting! I mentioned yesterday that in my recent tool haul I found two planes. They both need extensive restoration, and this #5 will probably be my most challenging restoration so far! My two previous plane restorations were Dad's #4 which was more a cleanup, and a Stanley Defiance #4 which was a pretty simple restoration. This'll be fun - let's get started!

I've learned over the last few restorations that old hand planes reward patience. Nothing about bringing one back to life happens quickly. There are days spent waiting for rust remover to work, paint stripper to soften a century-old finish, glue to cure, or fresh paint to harden. But that's part of what I enjoy.

A plane like this wasn't built in a hurry, and restoring one shouldn't be rushed either. Every step is another chance to appreciate the craftsmanship that went into making it more than a hundred years ago.
Plane Anatomy
Just to make sense of this post, here's a plane anatomy chart:

That'll help as we go through this and subsequent posts about this restoration. I'm guess that'll be a total of 2 maybe 3 posts.
What Are we Dealing With Here?
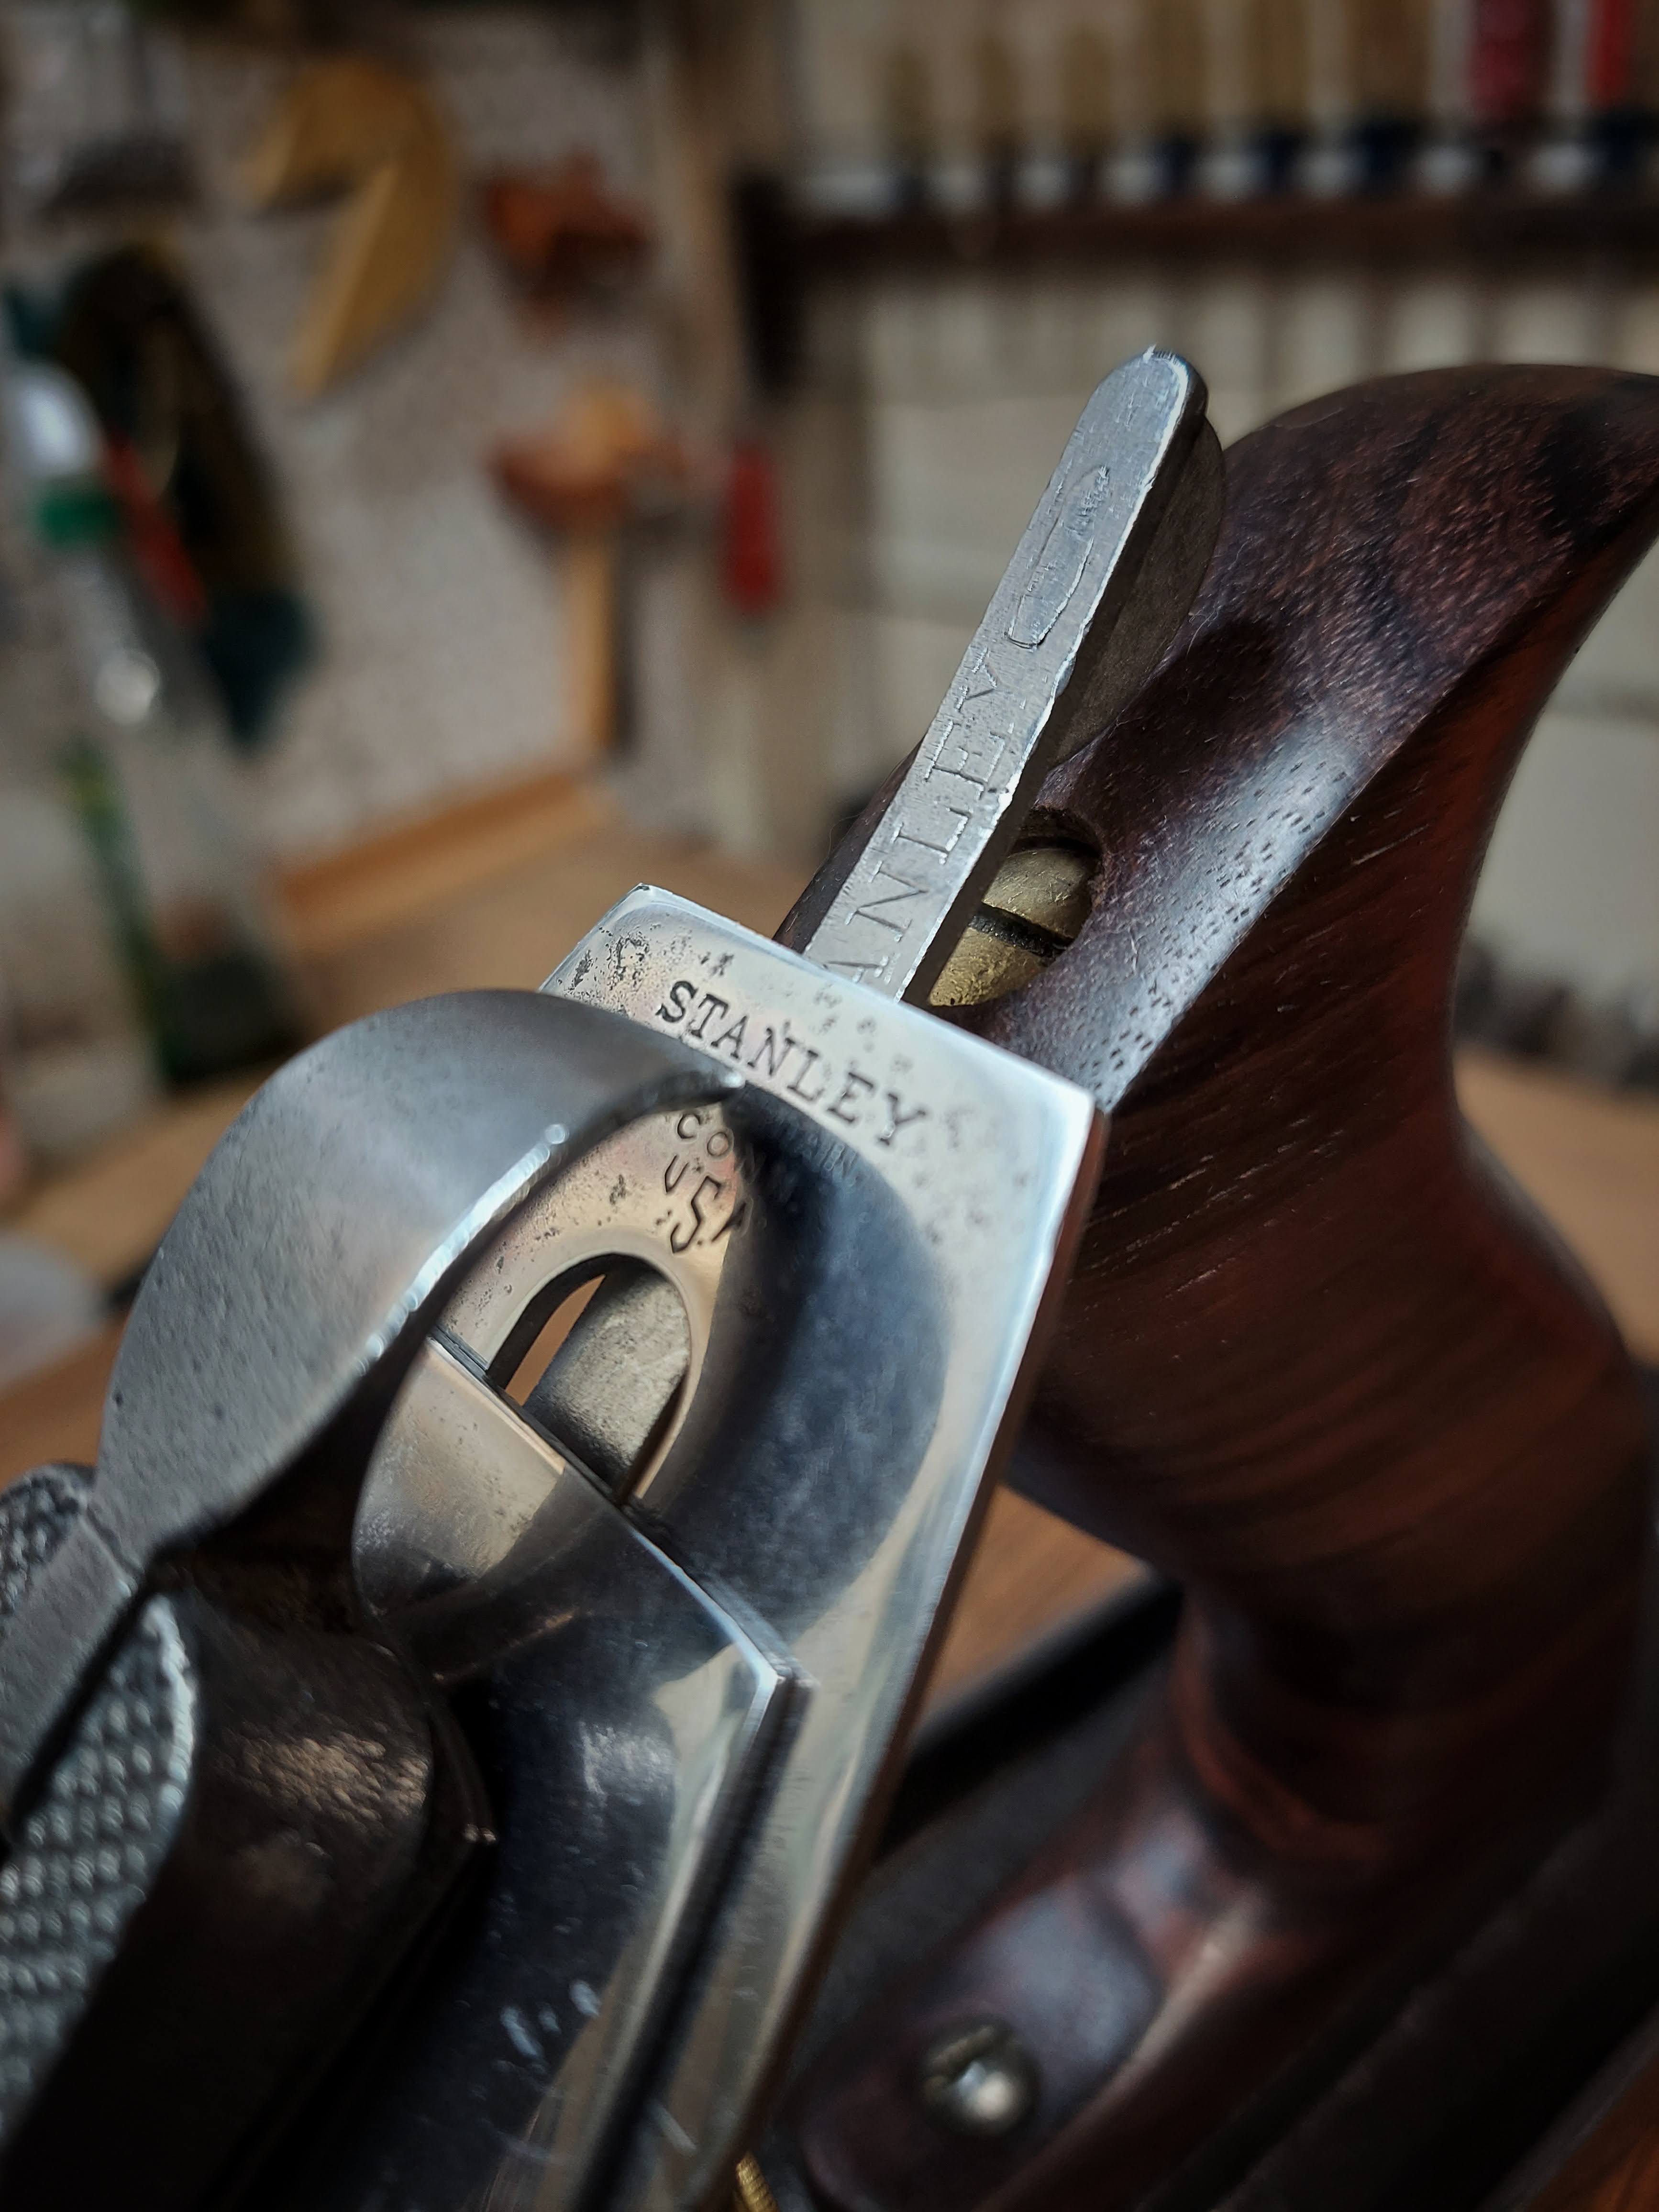
First, as you can see in the first picture of this post, this is a Bailey plane. I knew it had to be a Stanley because the Stanley Rule & Level purchased the patent rights to Leonard Bailey’s plane design. Their relationship broke up in 1875 and Stanley won the right to the patents as well as the ability to maintain the Bailey name on the planes.

Virginia Toolworks has a great history of Stanley and their planes, it's worth checking out! Just to show the Stanley piece, I found the maker's mark on the plane iron:

As soon as I could, I gathered what I knew about this plane such as:
- It has 3 patent dates on the plane body
- The depth adjustment wheel was 1" (new versions have 1.25" wheels
and ran that info through an algorithm and found out that I have a Type 11, and that this plane had been build no later than 1918!

The Assessment
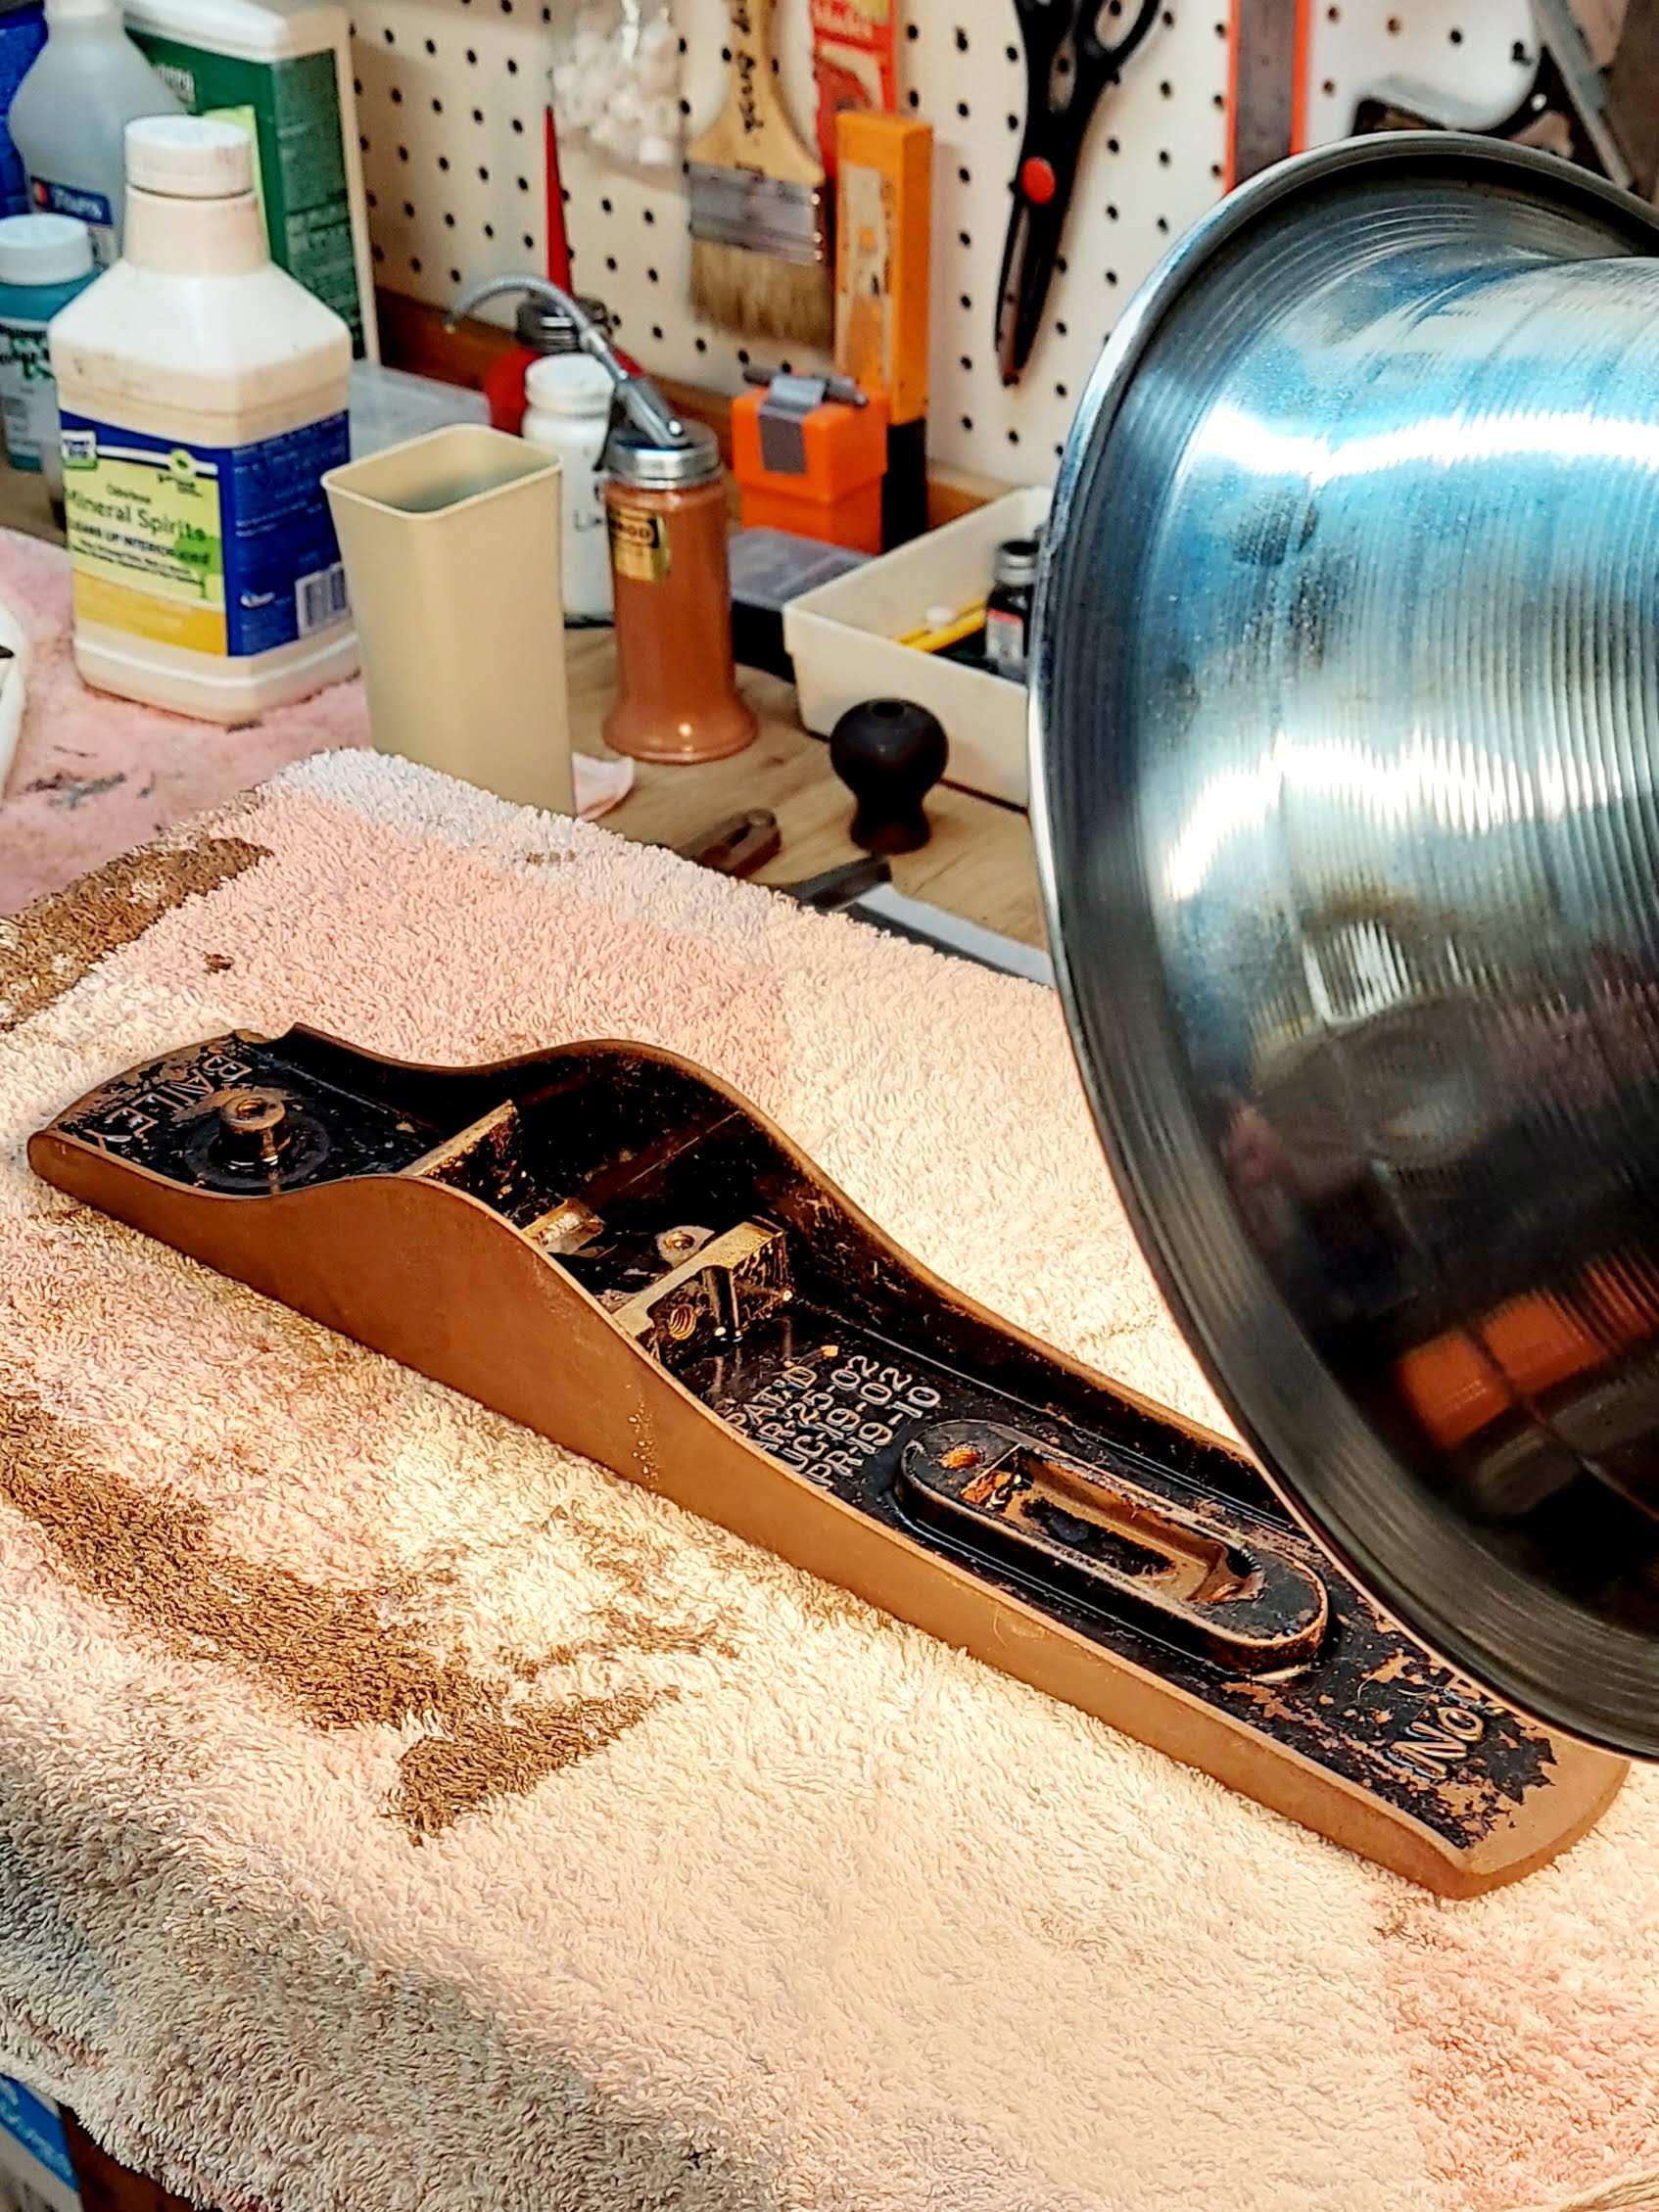
Before we get started, let me give you a tour of the condition of this plane. First, there are very few major malfunctions. Sure it's grimy and rusty, but overall, this beauty is in great condition!

But all was not perfect. The tote clearly had issues...


But it does have the most unique lever cap I've ever seen on a plane. All I've ever seen has been smooth caps with the maker's name or logo. I have a plan for this!

The only other real "problem", which has absolutely zero impact on the functioning of the plane, is that the right front and rear edge of the body side are chipped. No problem, I'll just file those smooth.

My Planes
∙ Block Planes - I have three
∙ Stanley 12-904 - very inexpensive, will be a scrub plane
∙ Surform planes - for sheetrock
∙ Stanley Bailey No.4 - Dad's and a Stanley Defiance)
⎯⎯⎯⎯⎯⎯⎯⎯⎯⎯⎯⎯⎯⎯⎯⎯⎯⎯⎯⎯⎯⎯⎯
You might like some other House 173 tool posts!
Time for Cleanup
This plane is dirty. It's not just the dust and dirt of sitting in a toolbox for some 40 years. This plane shows the buildup of sweat and grime from a whole career of carpentry. It even had a nice little collection of shavings...

After dusting and wiping, it was clear there was so much grime a simple soak wasn't going to do the trick. So I soaked the parts in some degreaser. It worked like a charm!

The #5 Jack plane, measuring 14"L, 2"W, and weighing 4 3/4lbs, was made by Stanley from 1869 to 1984, and was the standard jack plane that Stanley sold by the boatload. This is the most useful of all the bench planes, and it is a very good plane on which to learn technique. It is the first plane used on rough stock to prepare the surface prior to use of the jointer and smoother. Practically every John Q. Handyman had one of these planes, of one make or another, for household uses such as trimming a door or sash.
Its iron is often ground slightly convex so that a heavy cut can be taken; the edges of it are rounded off so that it doesn't dig into the wood. Each and every woodworker, including the 'lectrical toolers of the world, should have this plane.
The plane can serve several roles when one doesn't have all the other planes in his kit. It can do the surface preparation with its mouth set wide and a deep set to the iron, it can do smoothing with its mouth set narrow and a shallow set to the iron, and it can do jointing, although not as easily as the true jointers, the #7 and #8. - Patrick A. Leach in Supertool.com
And here's where I left off for today. Most of the plane parts are soaking in rust remover...

And I have some paint stripper on the plane body. The problem is in the original manufacturing process, the body was japanned. That stuff is tough and I think it's going to take some time for paint remover to lift it, so I wrapped the plane in plastic wrap to keep the remover from drying out overnight - we'll see how that works out.

Some Bonus Pics Before We Go
The frog is in pretty decent condition:

Here are the patent dates that were helpful in entering info into the algorithm...

And here's the body drying in the oven after coming out of the degreaser...
And there we have it. I'm anxious to see how things look tomorrow, in the meantime...
NOTE: The finished product can be viewed in this post!
Happy Columbus Day!
______________________________
Vintage Bailey No. 5 Plane Restoration Done!
GBS October 24, 2022
My Inherited 1918 Stanley
When last we met, the Stanley Bailey #5 plane had been cleaned (it was an incredible mess) and paint (japaning) removal had begun. It's taken quite some time, I mean it's been nearly two weeks since the first post, so I'm guessing this plane restoration has taken a good 3 to 4 weeks! Fair warning, this post is going to be heavy-laden with pictures.
Finishing the Paint Removal
We left off with the plane having ben wrapped up in plastic wrap to soak in paint remover and was then drying in the shop oven:

Because japaning is so tough, the Citrustrip didn't even touch it. I knew instantly that it would need to soak - for a long time. I started thinking about containers to soak it in, when I remembered John over at Scoutcrafter used PVC pipe to make a soaking station. As it turns out, I've had this length of pipe stored for nearly 30 years, always holding onto it because hey, you just never know when you might need a piece of PVC pipe. And this piece's day had arrived!

I cemented a cap onto one end, used a couple clamps to stabilize it in an empty container just in case it leaked, tied some wire to the plane to make retrieval easier and voila - the plane was soaking!

I had to soak the plane for, I think, three days before anything really happened. As you can see, it did a pretty good job removing the japaning:

But I still had to spend about an hour chipping awey at some stubborn spots...

I also soaked the lever cap in paint stripper for a day, Here's a before and after:


Taping and Painting
It seems it took forever to get to this point but on Saturday, like out of the blue, it was time to paint! Of course some parts needed to be taped first. And let me just say...for years I struggled with taping because I always just used whatever box cutter was at hand. But recently, I got a hobby knife and that changed everything, making trimming the tape almost enjoyable. And by-the-way, I was today years old when I leaned an exacto knife is a brand name: X-Acto, who knew?

And of course, I had the struggle with what color to paint the plane. I was originally going to go with red like I did with the Stanley Defiance #4, but then I saw Restoration by Alabama Creeks restore a plane and painted it using Rustoleum's Oil Rubbed Bronze and it looked fantastic. Not above glomming onto a good idea...I did likewise with this #5!

An once again following Scoutcrafter's practice, I wiped the raised lettering with acetone for a really nice look:

And here's the other end. That bare metal look on the black background just has that, that, je ne said quoi!

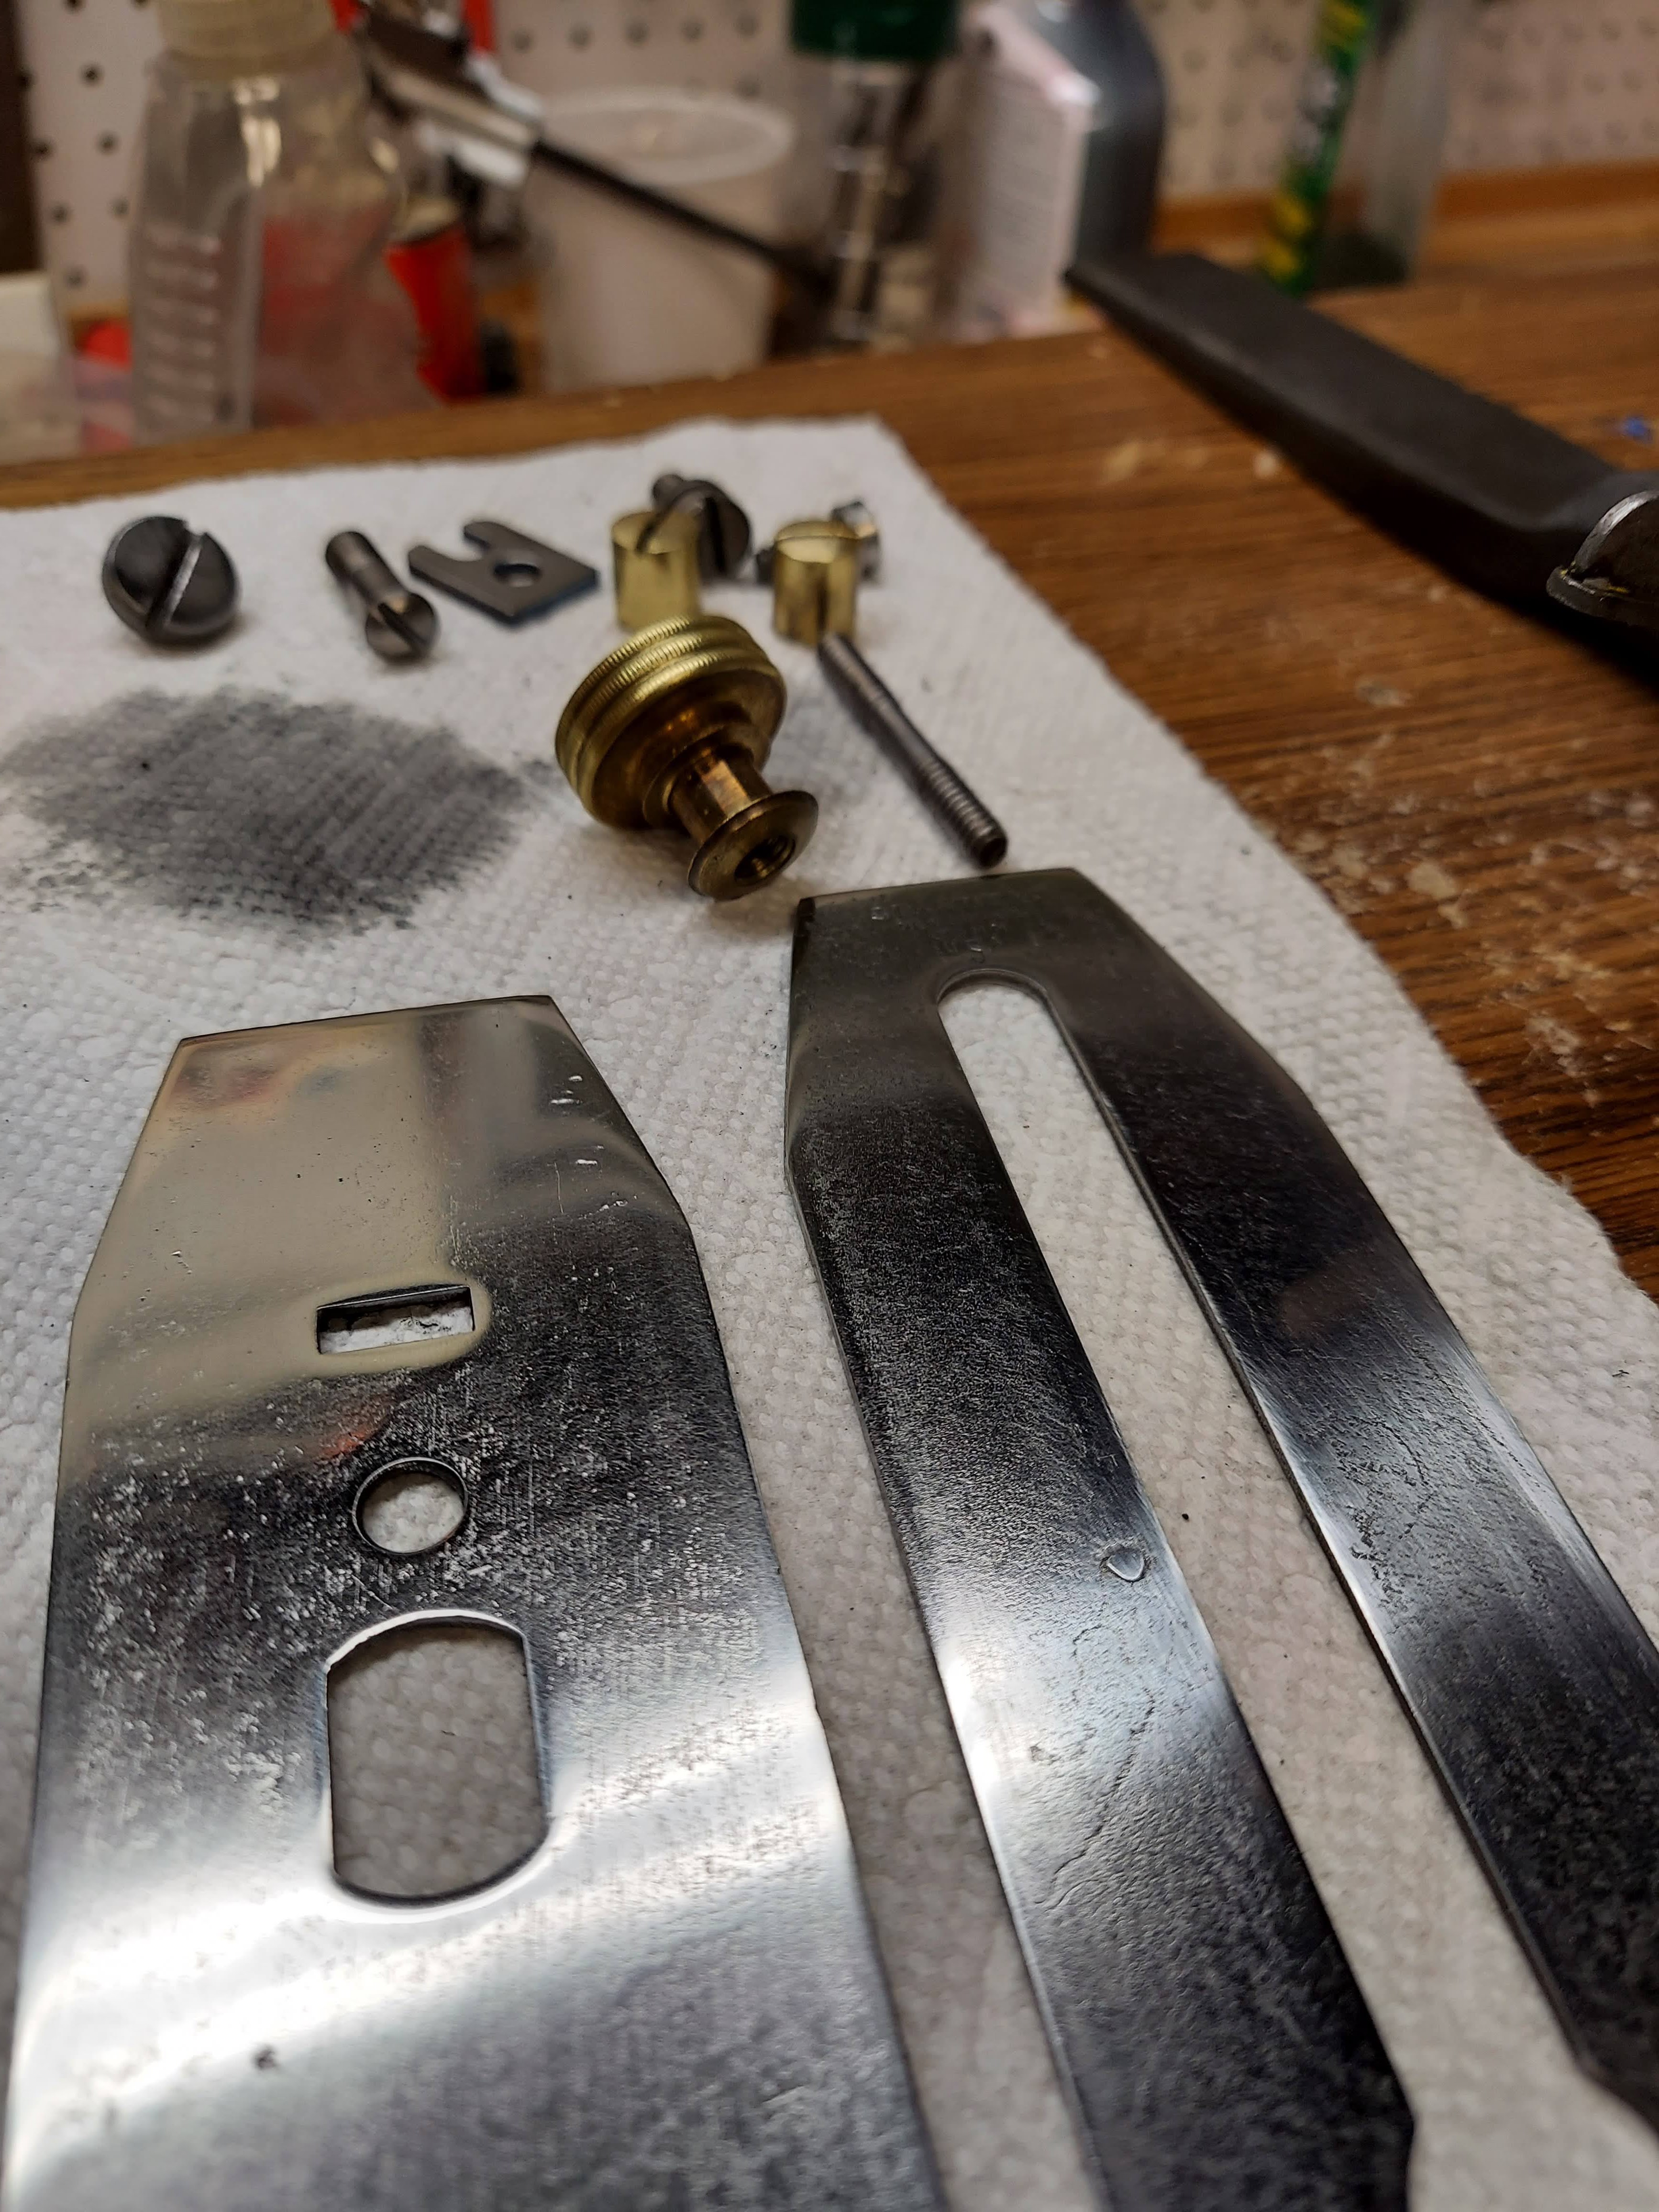
Parts and Pieces
Once the body was painted, it was time to get after the parts and pieces. For the last few weeks they'd been sitting in a bowl with the occasional WD40 spritz.

And just for fun, mid-project, this is what things start looking like around the bench. It's projects like this where my bench vise earns its keep!

This part of plane restoration is really fun. All these little pieces look so nice, and it usually happens over the course of an hour or so.

And I love it when the time comes to work on the brass parts. Any opportunity to use Brasso is welcome. It always takes me back to my Army days.

You'll also notce that throughout this restoration, I didn't take everything down to a "like new" finish. It may be a bit sentimental but I don't like to remove all evidence of those who came before. There's a kind of homage in these tools, a history worth passing on. I know - near maudlin.
Today I want to talk to you about a very well-known manual woodworking tool that tests the skill of a craftsman: the planer. It is an instrument that has its origins in ancient Egypt, and to use it to the best one must have excellent manual skills.
The world of planes is really varied: even a carpenter can get confused when it comes to distinguishing with confidence between a top rail, a roughing or a finishing plane. It is therefore a world in which it is very easy, but also pleasant, to get lost. - Mister Worker
The Handle and Tote
Back when I first took this plane apart, the tote immediately broke into two pieces. A quick look at this picture makes thing kind of self-explanatory:

I didn't even spend a second considering a repair. After a quick search I found Michael K Woodworks and ordered a new handle and tote. They weren't cheap, but they're beautiful and a perfect fit!

When installing the tote I noticed the front screw really didn't cinch down on the body. I swear I must have gone through every screw in the workshop (which isn't inconsiderable) but couldn't find one with the right thread pitch and the right length.

Interestingly, I inherited a can of brass screws when 173 was bought from the Mosher's. So I cut a screw to length, re-tapped that front screw hole, and ran a die over one of those brass screws!

About a minute of shining later, and the screw really complemented the brass of the depth adjustment wheel!

Some Beauty Shots!
And finally a little photo gallery. I told you there'd be a lot of pictures in this post. Just a note, I used two different cameras and changed lighting in these pictures because I like the look of the plane in different lighting. I don't know - it's like a sickness!


Natural Habitat
If you're reall quiet now, we just might get a glimpse of the 1918 Stanley Bailey Type 11 Number 5 Jack plain in its natural habitat. And looky there!

It's almost like that spot was planned for the #5...hmm.
Hey, thanks for stopping by - see ya' next time!

I think this might be my favorite tool restoration you've done so far. Even though I don't know much about old woodworking tools, you explained everything in a way that was easy to follow. It was fun watching this old plane slowly come back to life, and I found myself looking forward to seeing how each step turned out.What I liked most was that you never tried to erase the tool's history. You cleaned it up, repaired what needed repairing, and made it ready to work again, but you still respected the fact that generations of people had used it before. By the end, it felt like you weren't just restoring a hand plane, you were preserving a little piece of craftsmanship that deserves another hundred years of use. - Anonymous Reviewer
Frequently Asked Questions
What is a Stanley Bailey No. 5 jack plane?
The Stanley Bailey No. 5 is one of the most versatile hand planes ever produced. Often called the "jack of all trades" among bench planes, it can be used for rough stock removal, flattening boards, edge jointing, and even finish smoothing with proper adjustment.
What does "Type 11" mean?
Collectors classify Stanley planes into "types" based on manufacturing changes over the years. Type 11 planes were produced between approximately 1910 and 1918 and are widely regarded as some of Stanley's finest users because of their quality and construction.
Why are Stanley Bailey planes collectible?
They combine exceptional craftsmanship, durability, and practicality. Many remain fully functional after more than a century and continue to outperform many modern economy planes.
What is japanning?
Japanning is a durable baked enamel finish applied to cast-iron tools to protect them from rust. Stanley used this finish on bench planes for generations because it was attractive, extremely durable, and resistant to wear.
Why is removing old japanning so difficult?
Original japanning was designed to withstand decades of hard use. Modern paint removers often struggle to dissolve it, requiring extended soaking or careful mechanical removal.
Why replace the tote instead of repairing it?
When a tote has multiple fractures or structural damage, replacement is often the most reliable long-term solution. A well-made replacement preserves the plane's usability while respecting the original design.
Why polish brass parts instead of painting them?
Brass naturally resists corrosion and develops a beautiful patina over time. Cleaning the original brass preserves one of the classic visual features of vintage Stanley planes.
Why not restore every part to like-new condition?
Many restorers prefer to leave small signs of age and honest use. Those marks tell the story of the craftsmen who used the tool and help preserve its character while still making it fully functional.
Is the Stanley No. 5 a good plane for beginners?
Absolutely. Because it can perform so many different tasks, the No. 5 is often recommended as the first bench plane for anyone learning traditional woodworking.
Why restore old hand planes?
Many vintage planes were built to a standard rarely seen today. Restoring them preserves a piece of woodworking history while returning a remarkably capable tool to everyday use.
Keywords
Stanley Bailey No. 5, Stanley Type 11, jack plane restoration, vintage hand plane, Stanley plane restoration, antique woodworking tools, japanning restoration, Leonard Bailey, restoring old tools, woodworking hand planes, vintage Stanley tools, House 173