

━━━━━━━━━━━━━━━━━━━━


Originally, the back yard was much more open, but the fence was a thousand years old and we had a plan for what we wanted. Here's a picture of the corner where the shed is now. Early after buying 173, we put in blackberry bushes, but sadly they had to go. And look at that old flag pole. The Moshers had a cross bar at the top, and the clothesline pulleys were mounted on it!

Here's a little wider shot. By the time of this picture I had replaced the flag pole and planted a maple tree. Bad idea! I had not really thought that out, and it eventually dawned on me that a maple tree grows huge and would eventually take over the whole back yard. So when it was time to build the shed - out came the tree.

I have no progress pictures from when I was building the shed, we didn't do much of that back then, but here is a shot of the newly built shed.

And here's yours truly, apparently happy that we had a shed. Amazing how seemingly empty the shed was back then! Oh! And there's the yard tool organizer I made out of scrap 2x4s and some furring strips!


But the work is going on outside the shed. For the last couple years I tried to convince myself that it was looking rustic, but the fact is, it's just wearing out a bit (and no, it's not crooked, the photographer is!)...


I started with the window. When I built the shed, I didn't put a window sill in, no idea why, but I didn't...


I finished the trim tonight, except around the door, need to pick up a couple more boards, but finishing that off won't take long...

And that's where we leave off for tonight...I'm hoping to get this project done in short order, that'll depend on the weather!

The problem was, the wall on that side of the shed had bowed maybe 2 or 3 inches over the years, so I had to do some serious shimming!


But, as you can see, it certainly adds a little interest to the shed. But there's more of a purpose, that'll be clear another day!

Then it was time to start priming. Ever since the shed was built it had been stained at least a couple times, and with plans to paint it, the shed definitely needed to be primed...


And here's where we are now. Looking up close, I think a second coat of primer is needed to reduce the amount of bleed-through from the stain.


And when I built the shed, I used another one (I think I still have at least one other in the workshop for some future use). The shed's been up for some time, and the old basement window was really starting to show its age...

So it was time to get 'er fixed up! I started by used my trusty old heat gun to remove the window glaze.


When I was removing the glass I broke the corner of one of the panes. As luck would have it, I had a "spare" I had saved from one of the other old windows, one that I think was in too rough a shape to keep. It was just a smidge too big, so I used the rotary tool to really clean out the old glaze.

That worked great, which is good because the oversize was so tiny there would be no way to cut that little bit off the pane. Anyway, then it was time to prime the window frame...

And that's where it stands. Not an exciting post, but I enjoy looking back at the little things we do here at 173 to keep original parts and pieces when possible! Let's hope for less humidity soon!

I think just about every project I lament my complete inability to estimate the time it will take to do a project, and this project was no exception. The first post was way back on June 26, and here we are on August 11th and it's finally finished! What I didn't figure was the number of either rainy days, or days that were too humid to paint, not to mention some tasks I hadn't thought of. First a bit of recap...

That's an odd-looking shot of when I first built the shed. I forget exactly when I built it, but it was at least 15, if not closer to 20 years ago. That's really quite amazing because I built it on the cheap, back then we really had to pinch pennies. Yet, the shed has held up well all these years! But alas, the ol' shed was really starting to show its age...

I started out by replacing all the corner boards, as well as the door and window frames, and added a sill to the window...


The next step was one of those I hadn't previously thought of, the window. That old basement window was in serious need of repair! I used the trusty old heat gun to take out all the old window glazing...


Then, after priming and painting the frame, it was time to re-glaze. First the glazier's points went in...


After all the walls and trim were painted, it was time for the door. And here you can see that we went with Goldenrod to match the doors on the house!


Ah, what's that on the side you say? I'm glad you asked! So, the west side wall had a bit of damage from where we once mounted a mirrored window...

Because it wasn't extensive damage, so instead of replacing the wood I decided to cover the damage. I put a couple shelves on the side wall, and used these cool threaded pipes as shelf brackets!

And went with a little asymmetric layout just for fun, and here's how that worked out!

I love the way it turned out, but sheesh, it took weeks! On to the next project!
FROM A MISGUIDED TREE PLANTING
TO A SIMPLE STICK-BUILT SHED
AND A BEAUTIFUL FACELIFT
━━━━━━━━━━━━━━━━━━━━
The full story of how an aging backyard shed slowly became one of the most useful spaces at House 173.
Back in 2019, a time which, on looking back, seems a whole different world from what we live in now, I woke one morning and decided it was long past time to refurbish the old garden shed. Somewhere along the way I had a vision for how I wanted to change it - let's take a look back!

The Shed Rehab: Finally Doing It!
GB Shaw June 26, 2019
Way Past Overdue

Originally, the back yard was much more open, but the fence was a thousand years old and we had a plan for what we wanted. Here's a picture of the corner where the shed is now. Early after buying 173, we put in blackberry bushes, but sadly they had to go. And look at that old flag pole. The Moshers had a cross bar at the top, and the clothesline pulleys were mounted on it!

Here's a little wider shot. By the time of this picture I had replaced the flag pole and planted a maple tree. Bad idea! I had not really thought that out, and it eventually dawned on me that a maple tree grows huge and would eventually take over the whole back yard. So when it was time to build the shed - out came the tree.
I have no progress pictures from when I was building the shed, we didn't do much of that back then, but here is a shot of the newly built shed.

And here's yours truly, apparently happy that we had a shed. Amazing how seemingly empty the shed was back then! Oh! And there's the yard tool organizer I made out of scrap 2x4s and some furring strips!

Pretty crude but it's still going strong!

Here's a wider shot of the interior, and yes - I ran power to the shed!

Here's a look at the other end...

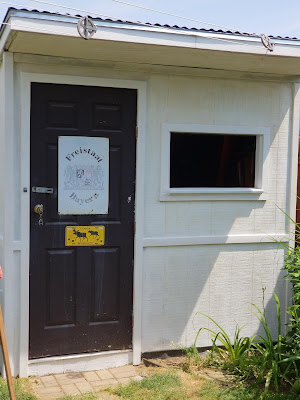
But the work is going on outside the shed. For the last couple years I tried to convince myself that it was looking rustic, but the fact is, it's just wearing out a bit (and no, it's not crooked, the photographer is!)...

Here's a closer look - see what I mean?

I started with the window. When I built the shed, I didn't put a window sill in, no idea why, but I didn't...

So I decided to put one in now, I think it gives it a whole different feel...


It stood at the bottom of the garden,Old creosote worn wood chipped.Time rusting away its thin hingesThat holds the door in place.Inside cobwebs hang like fadedCurtains in far corners whoseOccupants crawl between plant-potsAnd rusted tins of screws and nails.A toothed rake and hoe stand talkingIn one corner with a rusting spadeAmong shelves with paint pots and oldCoffee jars containing nuts and bolts.An electric mower with spaghetti linesHide behind a wooden bench that hadA vice bolted firmly at one end waitingFor work opposite a dusty window. - David Wood at PoemHunter.com
The Shed Rehab: All Primed Up!
GB Shaw July 07, 2019
In the last post I pointed out all the reasons it was time to rehab the shed, including the old basement windows I had put mirrors in and put on the wall of the shed years ago. But, the old window frame had long since rotted away. It was time.


But I also added frieze boards, as you can see on the side of the shed. There's a reason for that, and it'll all come to light in due time!

This week, after having replaced all the trim, I caulked (almost) every seam in the shed...

Which left the shed looking a bit better already.

But I also added frieze boards, as you can see on the side of the shed. There's a reason for that, and it'll all come to light in due time!

The problem was, the wall on that side of the shed had bowed maybe 2 or 3 inches over the years, so I had to do some serious shimming!

In lotsa places!

And in the end, I was able to close the gap considerably - thank goodness for caulk!

But, as you can see, it certainly adds a little interest to the shed. But there's more of a purpose, that'll be clear another day!


A little different angle...

And here's where we are now. Looking up close, I think a second coat of primer is needed to reduce the amount of bleed-through from the stain.

Immer Arbeit!
The Shed Rehab: Finally Making Progress
GB Shaw July 26, 2019

But then came the weather. Between work, rain, heat and high humidity, there just hasn't been a good time to start painting. Until today that is. I had a day off work, woke a little early (not nearly as early as mom and dad though, those two wake the roosters!) and tried to beat the humidity. And it worked - at least for one wall...

For now I'm only painting two walls, as the back and right side walls are hidden by fences, but the left side wall is going to be painted, but the humidity skyrocketed as I was finishing the front wall today, so that'll have to wait. In the meantime, I got started on fixing up the window.
It Already Looks Better!
Summer's always interesting for getting projects done. For one thing, depending on what you're doing, you have to be strategic about timing. This is one of those projects! When last we met, almost three weeks ago, the shed had been all primed and ready for painting.
But then came the weather. Between work, rain, heat and high humidity, there just hasn't been a good time to start painting. Until today that is. I had a day off work, woke a little early (not nearly as early as mom and dad though, those two wake the roosters!) and tried to beat the humidity. And it worked - at least for one wall...

For now I'm only painting two walls, as the back and right side walls are hidden by fences, but the left side wall is going to be painted, but the humidity skyrocketed as I was finishing the front wall today, so that'll have to wait. In the meantime, I got started on fixing up the window.
After replacing the basement windows way back in 1998, I saved the old wood windows because, well... you never know when you might need an old wooden window!

I used one of the windows to make a book case for the front porch...

And when I built the shed, I used another one (I think I still have at least one other in the workshop for some future use). The shed's been up for some time, and the old basement window was really starting to show its age...

So it was time to get 'er fixed up! I started by used my trusty old heat gun to remove the window glaze.

Then I went to work on it with the orbital sander.

Which made quick and easy work of stripping the wood.

When I was removing the glass I broke the corner of one of the panes. As luck would have it, I had a "spare" I had saved from one of the other old windows, one that I think was in too rough a shape to keep. It was just a smidge too big, so I used the rotary tool to really clean out the old glaze.

That worked great, which is good because the oversize was so tiny there would be no way to cut that little bit off the pane. Anyway, then it was time to prime the window frame...

And that's where it stands. Not an exciting post, but I enjoy looking back at the little things we do here at 173 to keep original parts and pieces when possible! Let's hope for less humidity soon!
The Shed Rehab: Finished!
GB Shaw August 11, 2019
It's Finally Done and Looks Great!


That's an odd-looking shot of when I first built the shed. I forget exactly when I built it, but it was at least 15, if not closer to 20 years ago. That's really quite amazing because I built it on the cheap, back then we really had to pinch pennies. Yet, the shed has held up well all these years! But alas, the ol' shed was really starting to show its age...

I started out by replacing all the corner boards, as well as the door and window frames, and added a sill to the window...

Then the frieze board (or whatever the correct name is) was added:

Then the caulking and priming was done...

And by the end of the last post, way back on July 7th, the shed was primed and ready!

The next step was one of those I hadn't previously thought of, the window. That old basement window was in serious need of repair! I used the trusty old heat gun to take out all the old window glazing...

Then sanded it down to the bare wood...

Then, after priming and painting the frame, it was time to re-glaze. First the glazier's points went in...

Then the glaze, which really takes practice and patience...

Then the painting began!

I wanted the shed to have the same color theme as the house...

So, can you see where this is going?

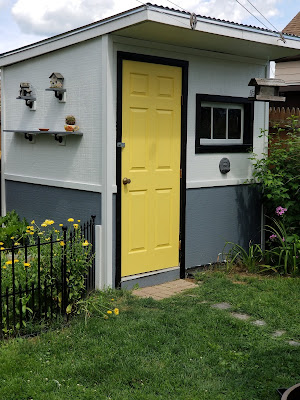
After all the walls and trim were painted, it was time for the door. And here you can see that we went with Goldenrod to match the doors on the house!

And here she is!

Ah, what's that on the side you say? I'm glad you asked! So, the west side wall had a bit of damage from where we once mounted a mirrored window...

Because it wasn't extensive damage, so instead of replacing the wood I decided to cover the damage. I put a couple shelves on the side wall, and used these cool threaded pipes as shelf brackets!

And went with a little asymmetric layout just for fun, and here's how that worked out!

And here's a nice shot of the finished product...

I love the way it turned out, but sheesh, it took weeks! On to the next project!
Frequently Asked Questions
Is remodeling an old shed worth it?
Yes. Remodeling an old shed can be far more affordable than building a new structure and allows homeowners to create customized storage, workshop, or hobby spaces while preserving existing materials.
How much does a DIY shed remodel cost?
Costs vary widely depending on repairs, insulation, electrical work, and finishes, but many DIY shed remodels can be completed gradually on a modest budget over time.
Can an old shed be turned into a workshop?
Absolutely. Many older sheds make excellent workshops once cleaned, repaired, insulated, and properly organized with work surfaces and storage.
What should be repaired first in an old shed?
Structural issues such as roofing, flooring, moisture damage, framing, and foundation problems should usually be addressed before cosmetic improvements.
Do backyard workshops need insulation?
Insulation can make backyard workshops more comfortable year-round, especially in colder climates where temperature swings affect tools and usability.
What is the best flooring for a shed?
Plywood subfloors, sealed wood floors, rubber mats, or concrete surfaces are all common shed flooring choices depending on budget and use.
How do you organize a small workshop shed?
Wall-mounted storage, pegboards, shelving, magnetic tool holders, and mobile work surfaces help maximize limited shed space efficiently.
Can a shed remodel improve property value?
Well-maintained backyard structures and organized workshop spaces may improve functionality, curb appeal, and overall property desirability.
Keywords
shed remodel, backyard workshop, DIY shed renovation, shed transformation, old shed makeover, DIY backyard projects, storage shed remodel, shed before and after