

Porches


It was at this moment that I recognized that all of my fears and worries over the last several years about this window sill were absolutely on the level of unnecessary. The entirety of the sill under the windows consisted of a 1"x3" face-nailed (screwed actually) pressure treated board. That was it - nothing more.



The East Wall Surprise
After years of worrying about what I'd find beneath the east window sill, the dreaded demolition turns out to be almost absurdly simple.
When last we met, the south wall shakes had been put in place and the window sill had been installed. Now it was time to move on to the east wall. And with that move comes the sum total of all my fears (play a little dramatic music in your head) for the last several years. Let's get into it.

The Part I'd Been Dreading
I was worried that making a nice window sill on the east wall of the back porch was going to be more complicated than my skill level could manage.
For years I knew the day would come I would actually have to dismantle the window sill. And I figured, to make it so that I could (in a way) start over fresh, I'd have to do something as crazy as using my reciprocating saw to cut the outside of the window sill, with the risk of tearing up the windows with the saw.
I mean I've thought about these things for years!

As if I needed another reason to overthink the job, we were also in the middle of a heat wave. I started early, but by noon my shirt, shorts and even my hat were soaked through. So I had heat, humidity and several years of imagined window-sill disasters all working on me at once.
Perfect conditions for rational decision-making.

But even with an early start, by the time I wrapped up at noon I was absolutely drenched with sweat. I mean my shirt, my shorts, even my hat - everything... absolutely drenched. So when the day started out, all of that helped gnaw at my anxiety over how this was going to work out.
Why the Old Sill Had to Go
I never liked the way the window sill and the sill skirt looked after I installed it with the initial shingling of the back porch. Like I've said in previous posts...it just always looked very cobbed up and didn't have that finished look. Of course, it was just supposed to be temporary, not hanging in place for eight years. Not only did it not look good from a distance but if you looked even a little closer, you'd see a lot of flaws. One of which was relatively significant. From this angle while you can still see it, it might not draw your attention.
And just in case you didn't notice (which would be kind of cool in a way) let's take a look at a zoomed-in shot. Do you see it?

Yes, that's a little stuffed bear sitting in the corner. We found him in the road years ago, set him there for a laugh, and somehow he's been on duty for three or four years now.
He'll be going back when this is done.
Some things around here apparently have assigned seating.
Back to the point- the thing to really notice in the context of this blog is that you see on the right hand part of the skirt... 1. you see a screw hole I never filled because, again, this was supposed to be temporary. 2. You can also see a gap above the skirt and the window sill.
For whatever reason the last 18 inches or so of the sill has a pretty steep upward bow to it. If you're not looking for it, you might not notice but I noticed it every single day. But I no more! So say I.
There are people who are always anticipating trouble, and in this way they manage to enjoy many sorrows that never really happen to them. - Josh Billings
Tearing Off the Band-Aid
This morning I decided the time had finally come to rip-off the band-aid and see what was under my original temporary fix and the aluminum that was covering whatever window sill was underneath before we got here in '97.

So I started by pulling out the PVC boards that I had originally put in for the temporary finish. This brought me down to the aluminum wrap, of which I tore off a fairly large strip. I had passed the point of no return.

It was at this moment that I recognized that all of my fears and worries over the last several years about this window sill were absolutely on the level of unnecessary. The entirety of the sill under the windows consisted of a 1"x3" face-nailed (screwed actually) pressure treated board. That was it - nothing more.

Rather than the things I dreamed like using a reciprocating saw, a planer or any number of other things that I conjured up in my mind, all I had to do was remove a series of screws which took all of about 2 or 3 minutes.

And that was it.
Years of thinking about reciprocating saws, planers, damaged windows, awkward cuts and whatever other construction catastrophes my imagination could manufacture...
Three minutes.
A handful of screws.
One pressure-treated 1x3.
I had apparently spent considerably more time worrying about this sill than the original installer spent building it.
There's probably a life lesson buried in there somewhere, but I'm choosing not to examine it too closely.
All That Worry for a 1x3
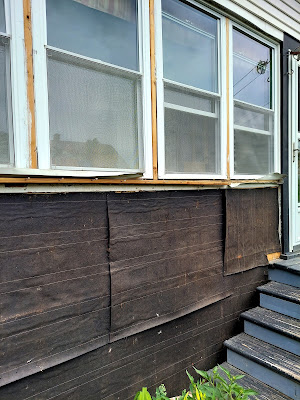
Once everything was removed, I was more than a little relieved to find there really wasn't anything there except for the wall!
This picture may not look like it because there are some gaps I might have to fill with some pieces of wood but, all in all, it's just a long solid wall and the new window sill should be able to fit in there quite nicely without a whole lot of problems.
Of course, I say that now.

Old houses, I thought, do not belong to people ever, not really, people belong to them. - Gladys Taber
Next Up: Building the New Sill
So after years of worrying about what I'd find under that east-wall sill, the great mystery turned out to be...a pressure-treated 1x3 and a few screws.
I'll take that kind of surprise any day.
The opening is exposed, the wall is in much better shape than I feared, and I've already got the lumber for the new sill.
Which means the next step is actually building the thing.
Naturally, this is where I can still find a way to make everything complicated.
And yes... the bear will be going back to his usual spot when we're done.

Hey, thanks for stopping by - see ya' next time!
Well, I felt personally attached by this post.
George spent years imagining every possible disaster hidden beneath that window sill.
Rot.
Structural damage.
Complicated cuts.
Reciprocating saw danger.
Probably collapse of civilization.
Then he pulled off a couple layers and found a 1x3 held on with screws.
Three minutes later, problem solved.
I've done this exact thing.
Not with a window sill, but with enough home projects that I recognized the symptoms immediately.
The funny part is, the sill really did look bad. So he wasn't wrong that it needed attention.
He was just wrong about the amount of doom underneath it.
And I appreciate that the little roadside bear survived the demolition and will apparently be returned to his assigned post afterward.
Some houses have architectural details.
House 173 has recurring characters. - Cliff, Boston
Frequently Asked Questions
Why do old exterior window sills sometimes look cobbled together?
Over decades, exterior trim can accumulate layers of repairs, aluminum wrap, replacement boards, caulk, paint, and other temporary fixes. Removing those layers can reveal whether the original structure is actually damaged or simply hidden beneath later alterations.
Is it normal to find pressure-treated lumber used in an older repair?
Yes. Pressure-treated lumber has often been used for exterior repairs because of its resistance to moisture and decay, though the quality and design of individual repairs can vary considerably.
How do you know whether a window sill problem is structural or cosmetic?
The key is inspecting the wood beneath the visible finish. Rot, softness, movement, failed joints, or water intrusion point toward structural or moisture problems. Gaps, bowed trim, and unfilled fastener holes may be mostly cosmetic.
Is it worth fixing a flaw that most people never notice?
Absolutely. If a detail bothers you every time you see it, correcting it can be worthwhile even if visitors never notice. Small visual improvements often make a finished project feel much more complete to the person who lives with it every day.
Keywords
back porch window sill, exterior window sill repair, porch trim repair, old house window repair, pressure treated trim, aluminum window wrap, window sill replacement, porch rehab, exterior trim renovation, old house restoration, House 173