

A Fine Yard Sale Find
About a year ago I stopped at a rummage sale and picked up three saws for $1 each, and two 4 1/2" C clamps for $1 - what a deal! At least - it was a great deal if you could look beyond the rust and worn condition of the saws.

The Find:
So here's a shot of the three saws I picked up for a buck apiece. A very nice hack saw (I think that's a Miller's Falls saw), a Great Neck back saw that I restored within a couple weeks of picking it up, and the subject of this short post - an unbranded compass saw:

KNOWLEDGE POINT: Compass saws are used primarily for cutting out holes on the interior of a board, but their thin tapered blade also allows them to be used to cut a curve on the exterior of a board. Compass saws were available with blade lengths from 10 to 18 inches. The blade on the compass saw is of very heavy gauge material that tapers from about 1 1/2" to a blunt point. Since the blade has no means of stiffening, and is already thin and prone to bending, the steel is quite a bit heavier than even that encountered on regular handsaws. Since in the course of cutting a circle, the saw encounters both ripping and cross cutting type cuts, the teeth on the compass saw are a combination of the two. While the profile more resembles rip teeth, they are sharpened with a fleam angle like crosscut saw teeth. The result is a saw that can cut in both types of grain, although with less efficiency than if it were one or the other. - Pete Taran at Vintage Saws

The Condition
I have no idea how old this saw is, but it's definitely of the quality that would indicate it isn't newly shipped from overseas. No, the wood is solid, the hardware is of good quality and the blade isn't chintzy at all! The blade just had surface rust that needed removing and the finish on the handle needed attention.

So I used a razor blade to remove the old finish on the handle, which took all of 5 or 6 minutes to get down to the bare wood.

Refurbishing!
After about 15 or 20 minutes of sanding and polishing, the blade was looking a hundred percent better:

It took a few minutes to consider how I wanted the handle to look. I thought maybe just natural, or just some amber shellac, but I decided to stain it using a slight variation of the 173 stain formula.

Some posts that talk about saws at 173
Label: Saw
∙ $1 Great Neck Backsaw restoration - August 2021
∙ Salvaging My Neighbor's Old Rip Saw - August 2021
∙ My Oscillating Saw - January 2021
∙ The Table Saw of Death - July 2017
⎯⎯⎯⎯⎯⎯⎯⎯⎯⎯⎯⎯⎯⎯⎯⎯⎯⎯⎯⎯⎯⎯⎯⎯⎯⎯⎯⎯⎯⎯⎯⎯⎯⎯⎯⎯⎯⎯
For fun, here's some Electricity posts
The color turned out even better than I imagined:

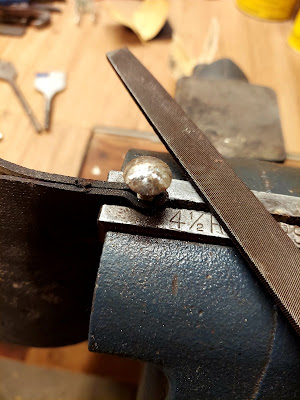
Then I took a file to the screw head, then spun it in the drill press to run some sandpaper over it 'til it pretty much had a mirror finish:
Then it was time for assembly:

Finished
This was a super quick project, took maybe an hour or so, except for drying time for the handle. But as quick as it was, the saw restored pretty nicely!

And one last beauty shot. No, it doesn't look brand new, but it looks well used and well cared for, which it will be going forward!

Its Natural Habitat
And here she is in her natural habitat - the pegboard of saws behind the boiler:

Keep your tools shined!
