

━━━━━━━━━━━━━━━━━━━━
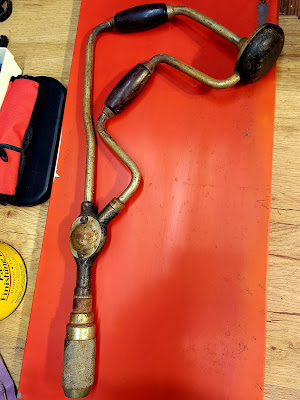
THE STANLEY NO.993 WITH
TEN-INCH SWEEP HANDLES AND
HEADS MADE OF COCOBOLO
━━━━━━━━━━━━━━━━━━━━
A rare Stanley No. 993 corner brace restoration brings new life to a fascinating old woodworking tool.
When it comes to vintage tool restorations here at 173, I'm usually telling you about having gone to The Tool Box and picking up some old tool. In this case, one of my colleagues gave me this tool, and I had no idea what it was. Of course I knew it was a brace, but this one was odd. Weird shapes, multiple handles, odd angles. Just weird, but I thought it would be a fun restoration.
Assessment
Whatever this brace was for, it was in good condition. There was a bit of grime buildup, some surface rust, and one side was missing the cover that goes over the gear housing. All considered - it was really in pretty good shape!
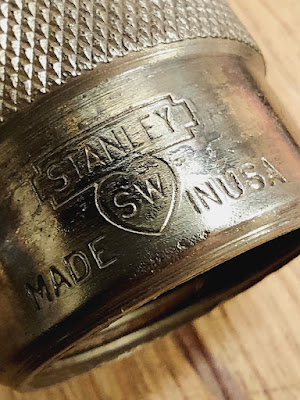
After a little soak in some water and Murphy's Oil Soap, I could see that this brace is a Stanley. Below the brand name is a heart with "SW" inside. The SW stands for Stanley Works.


After Googling "Stanley No. 993" I discovered there was precious little information about this brace. Sure, there were 993s for sale on eBay...

Imagine that - $110!! I wonder if this bloke was able to get that kind of price for this. Here's to hoping! But I also saw the 993 listed in this old 1930s (I believe that's the year I saw) Stanley catalog.

Lo-and-behold, there it was, a corner brace!

A Description from 1913
Here's a description from an interesting book from 1913 entitled Building Age:
The Stanley Rule & Level Company, New Britain, CT has supplemented its line of bit braces to include the No. 993 with a 10 inch sweep. For corner work, when using a bit of ordinary size, the work can be more easily and rapidly done because of the shape of the frame, which steadies the bit and enables the workman to turn the brace continuously instead of partially as when using an ordinary ratchet brace. The braces have metal-clad, ball-bearing heads, and the heads and both handles are made of cocobolo. The chuck quill is fastened to the head by three screws, one of which goes through that part of the frame where it enters the head, securely fastening all three together. The gears are of machined steel, the gear teeth are carefully cut, and the whole mechanism enclosed, which protects the working parts from dirt and also guards the user's hands.
One of my primary objects is to form the tools so the tools themselves shall fashion the work and give to every part its just proportion. - Eli Whitney
When I'm looking at vintage tools to restore, I look pretty close to be sure there isn't damage beyond my ability to repair, or parts missing. As it turns out, this brace was missing a gear cover on the opposite side from this one:

As soon as I noticed that, my mind began racing through all the metal-related things I saw may dad do when I was a kid. One of which was to make a metal piece to fix a rather large hole when he was prepping our old Volkswagen Squareback for a new paint job. He bent this piece of sheet metal around the headlight in the fender, riveted it in place and smoothed some filler all over it.

That picture isn't of our car, but if you put ours next to it you probably couldn't have told the difference. After a lot of prep, dad painted that car right there in the back yard, and as best I can remember, it turned out beautiful!

Oh - back to my point...that memory got me to thinking - all I needed to do was put a dent in a piece of metal. I wanted it to look good so at lunch one day I ran to the store and picked up a doming set and pound away!

After tracing around the original part, I took my snips to it, affixed it to the brace and used a file to trim it to the right fit.

It isn't a perfect match to the original on the other side of the brace, but I'm a little tickled with how it turned out...

Oh, and here's a YouTube video I found on how this tool is used. Definitely worth the watch for me!
Cleaning the Steel
I gotta tell you - I didn't spend a lot of time cleaning the steel parts. Obviously the rust had to go, and with it went the nickel (chrome?) plating. It just couldn't be salvaged. First, I took as much of the brace apart as I could, which amounted to just dismantling the chuck.

With the rust and WD-40 used to unfreeze the chuck, it was a mess!

The brace also needed a good cleaning because there was quite a coating of greasy film on it...So, I soaked as much as I could (I definitely didn't want to soak the wood) some hot water and Dawn dishwashing liquid.

The easiest way to clean up the metal parts was to just lock the brace in my vice and go at it with sandpaper. I was a little tedious, but definitely not difficult.

The Wood Parts
One of the things I like about old tools is that, in general, the quality of the materials was much better than the tools of today. They used steel or ductile iron or high grade aluminum, not just pot metals and chinesium. Handles were real wood, not cheap, new-growth wood or plastic. Such is the case with this brace. The wood handles were made of cocobolo.

What? Until this tool I'd never heard of cocobolo. Well, it turns out it's a hardwood from Central America and only the heartwood is used. Cocobolo can be polished to a glassy finish. Studying up on it, sources said polishing would make blemishes essentially disappear. But, the truth is, I had to do some sanding and a light coat of stain to have a good starting place for this piece:

Then, after a few applications of Paste Wax and sum buffing with the rotary tool, the head and handles were looking pretty good!

Its Natural Habitat
As you can imagine, there could be some storage challenges for a tool of this size and so oddly shaped. After an excruciating few seconds of consideration, I decided to hang it on the pegboard opposite the workbench. At least for the time being, this will be the corner brace's natural habitat. I have thoughts about the future - but we'll see!

This wasn't a difficult restoration, but calendar-wise it took me a few weeks. Workshop time - maybe 2 or 3 hours. The whole thing was fun, in particular learning what this tool was, and making my own part for it!

Thanks for stopping by!

Frequently Asked Questions
What is a Stanley corner brace?
A Stanley corner brace is a specialized hand brace designed for drilling holes in tight spaces where a traditional brace cannot rotate fully. The Stanley No. 993 used an offset frame for corner work.
What was the Stanley No. 993 used for?
The Stanley No. 993 corner brace was designed for drilling in confined spaces such as corners, cabinetry, framing, and tight construction areas where standard braces were difficult to operate.
When was the Stanley No. 993 made?
The Stanley No. 993 appeared in early 20th-century Stanley catalogs and was part of the company’s expanding line of specialized braces and boring tools.
Are vintage Stanley braces collectible?
Yes. Vintage Stanley braces are popular with woodworking tool collectors because of their mechanical quality, hardwood handles, and historical significance. Rare specialty braces are especially sought after.
What wood was used for old Stanley brace handles?
Many vintage Stanley braces used hardwoods such as cocobolo for handles and heads because of their durability and ability to polish smoothly.
Can antique hand braces still be used today?
Absolutely. Many antique braces remain fully functional after cleaning, lubrication, and minor restoration. Woodworkers still use them for traditional hand-tool woodworking.
Is restoring antique tools worth it?
Many woodworkers restore antique tools because older tools were often made with higher-quality materials and craftsmanship than many modern mass-produced tools.
What makes Stanley “Sweetheart” tools special?
“Sweetheart” Stanley tools featured the heart-shaped SW logo associated with The Stanley Works and are especially prized by collectors and vintage tool enthusiasts.
Keywords
Stanley No. 993, Stanley corner brace, vintage Stanley brace, antique hand tool restoration, vintage tool restoration, Stanley Sweetheart tools, woodworking brace, cocobolo handles, antique woodworking tools, hand tool workshop