

It's Finally Done and Looks Great!

I think just about every project I lament my complete inability to estimate the time it will take to do a project, and this project was no exception. The first post was way back on June 26, and here we are on August 11th and it's finally finished! What I didn't figure was the number of either rainy days, or days that were too humid to paint, not to mention some tasks I hadn't thought of. First a bit of recap...

That's an odd-looking shot of when I first built the shed. I forget exactly when I built it, but it was at least 15, if not closer to 20 years ago. That's really quite amazing because I built it on the cheap, back then we really had to pinch pennies. Yet, the shed has held up well all these years! But alas, the ol' shed was really starting to show its age...

I started out by replacing all the corner boards, as well as the door and window frames, and added a sill to the window...


Then the frieze board (or whatever the correct name is) was added:

Then the caulking and priming was done...

And by the end of the last post, way back on July 7th, the shed was primed and ready!

The next step was one of those I hadn't previously thought of, the window. That old basement window was in serious need of repair! I used the trusty old heat gun to take out all the old window glazing...

Then sanded it down to the bare wood...

Then, after priming and painting the frame, it was time to re-glaze. First the glazier's points went in...

Then the glaze, which really takes practice and patience...

Then the painting began!

I wanted the shed to have the same color theme as the house...

So, can you see where this is going?

After all the walls and trim were painted, it was time for the door. And here you can see that we went with Goldenrod to match the doors on the house!

And here she is!

Ah, what's that on the side you say? I'm glad you asked! So, the west side wall had a bit of damage from where we once mounted a mirrored window...

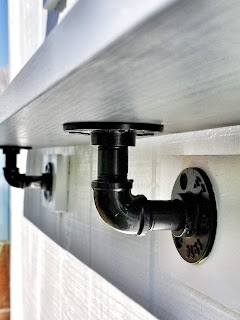
Because it wasn't extensive damage, so instead of replacing the wood I decided to cover the damage. I put a couple shelves on the side wall, and used these cool threaded pipes as shelf brackets!

And went with a little asymmetric layout just for fun, and here's how that worked out!

And here's a nice shot of the finished product...

I love the way it turned out, but sheesh, it took weeks! On to the next project!