Front Porch
A House 173 Megapost
The front stoop was never really finished, it simply evolved, one project at a time.
The front stoop has seen many changes over the decades. From simple cosmetic changes to a complete rebuild! This Megapost pulls together the story in one place. Some may be a little out of chronological order because I was trying to put them in a logical order, but if you're confused, keep reading because it'll all make sense in the end!
Looking back now, I don't think I've ever really finished the front stoop. Every few years it became whatever the house needed next. First it needed safer steps. Then it needed a proper landing. Later it needed color, stronger railings, better materials, and eventually little finishing touches that simply made coming home feel nicer.
That's probably true of most old houses. They aren't restored all at once. They're shaped a little at a time by the people who love them. Looking through these old posts, I realize the front stoop has quietly become a timeline—not just of the house, but of everything I've learned while taking care of it.
Legacy Post: The Front Stoop - 10/4/13
As I've mentioned before, in the early days of our having 173, there were no digital cameras, the internet was in its infancy, the premier search engine was Buena Vista (or something like that) and we had dial-up AOL. Seems like a different world ago! We weren't at all diligent about taking "before" pictures so this post has some old prints that I just took pictures of with my cell phone. Hopefully they're clear enough to get the general idea though.
Way back when we first bought ol' 173, there was no front stoop and the steps had really tall risers and very narrow treads. You can't really see them that well, but this picture gives you at least a little idea. I believe, from the early '70s. If you look closely you can see the hint of a pipe railing.
The 1990s, Remnants of Some Earlier Time
This next picture is sometime in the '90s. At this point someone before us had added the wood railings. When we first moved in the steps and railings were still that silver/gray. After painting the shingles brown (see below) we also painted the steps a kind of light beige...
Building a Stoop
But I never liked those steps. As I said, very steep with narrow treads and by that time they were getting a bit rickety. Besides that, I always wanted a stoop out front. Around '99 or 2000, and bunch of pressure treated lumber later...
 |
This shot was just a few days ago...
another tease of what comes next! |
We had a stoop. I sided it with shingles over OSB and painted it brown so we'd have that integrated (kinda) look (that'll be explained in an upcoming post).
Can't wait for the reveal of the current project here at 173!
You look at a streetscape full of porches, and it’s so much more inviting and friendly looking,” says Geoffrey Mouen, the town architect for Celebration. “It’s not because it’s an economic value; it’s a social value. It’s a psychological value that you recognize.
A Little Pop to the Front Stoop! (Oh the puns I considered!) - 6/23/13
Just a little project again this weekend. Years ago when I built the front stoop, we decided that staining was the way to go - less maintenance! But the other day I got the idea to paint the railings on the stoop. I like the way it turned out. On Friday I used 100 grit sanding pads to sand the whole thing, then it was a matter of painting. So here's the first before:
And midway through:
Another before:
And after:
Before:
And after:
That's the first coat. One more coat oughta do the trick. After that, the next step will really add some pop to the front of the house!
Yellow Door at 173 - 7/21/13
Back in August 2011 the back porch remodel was completed. One of my favorite touches was
the yellow back door. After seeing (and loving) the results...we decided that the front door just had to be yellow too!
The White Door Looked So Blah
So, a couple weeks ago the
front stoop railings were painted. Yeah, it "livened" up the front stoop a bit, but the truth is - that little project was merely preparation for this one! Here's the front door after the stoop railings were painted:
And...without further ado...(cue drum roll please):
Just for fun I thought I'd add in the extreme ends of the project. It's not a great shot (especially after cropping, etc), but here is the front door prior to August 2011:
And a close up:
And a wider shot of now!
Goldenrod - The Yellow at 173
For the record, here's the paint for the door:
It's "Goldenrod" by Valspar. On the computer it looks awfully bright, but in real life it's a rich, creamy yellow. As I've noted before, I've used Baehr paint from Home Depot on a couple occasions and was less than thrilled. So this time I gave Valspar a try. I really did like the way it covered, it's going to (obviously) take some time to find out about its durability.
Whatever you’re doing, it can wait. Take a load off and come sit a spell. Everyone is welcome. Membership is free. - motto of the Porch Sitters Union
Updating the Front Stoop - 10/14/13
As I
mentioned before, the main portion of the current project is complete and now it's just punch list items. Today was the front steps. Originally, in that little triangle below the steps we had old wood lattice we had painted brown along with the rest of the stoop maybe a dozen years ago. By the time this project started, that lattice was pretty worn out, and to do the siding on the stoop, that old lattice had to come out. This morning, this was the view:
I'm not exactly sure how I installed the lattice originally, but there weren't any spots for affixing the new stuff. So I had to put in some wood blocks:
Sanding and Painting
Once that was complete, I just took my palm sander and gave it a good sanding. Then I used Kilz primer to get it all ready for painting.
New Vinyl Lattice
Then it was just a matter of sizing, cutting an installing the new lattice. I found that my
Sonic Tool (my new favorite tool by the way) was perfect for making quick work of cutting the lattice. I opted for
vinyl lattice and the vinyl lattice trim.
And just a shot from the other side...
So the punch list is well under way! Not sure of the next step yet, but that trim has got to be painted before we get too much closer to winter.
That Stupid Little Thing Bugging Me - 7/23/16
You know how some things just bug ya? And sometimes it's just little stupid things? Well, I've had a stupid little thing bugging me here at 173. It's the front steps. Here's a shot of the front probably 2 or 3 years after moving in:
I have no idea how long those steps had been there, but they were pretty old. You may not be able to tell in that picture, but there was no stoop, the risers were really high, and the treads way too narrow.
Several years back I built a stoop and installed new steps, and it was ---- okay.
Out of love for all things Adirondack, 173 had that whole brown-and-white theme happenin'. But, a few years later they were beginning to look a little ragged:
But then we had the big porch redo back in '13, and the front stoop ended up looking like this:
So far, so good. But there's one...stinkin'....little thing that always bugged me.
You See It?
It's right there! All that work that went into the outside of the house, the total change from brown-and-white to white, gray and black - and yet, the steps remained brown. And just a big blob of brown at that. It caught my eye every-single-day when I came home from work. NO MORE! Today I draw a line in the sand and scream from the rooftop I DON'T HAVE TO PUT UP WITH A BLOB FOR STEPS! Okay, dialing back the drama. Fact is, I decided to paint a little (LOL - probably could have covered that in the first sentence and been done with it!). Of course with all that dark brown stain I figured some Zinser primer would be a good first step:
White Almost Won Out
I really liked the white on the risers, but there was an almost unfinished look to it for me, so I decided to go with the
Valspar Elephant Gray (which exactly matches the Flagstone siding).
A little closer look...
So I only painted the risers, and in real-time the treads are a very dark brown - almost black, so I decided to leave the treads as-is for the time being. Ultimately, I plan to replace the treads altogether so I think I can live with this for now. At least it's not a huge blob anymore!
New Front Stoop Railings - Part 1 - 9/17/17
If nothing else, 173 is an evolutionary beast. Occasionally there are big alterations, but most of the time it's a matter of small, slow, subtle changes. The front stoop is just such a case.
This picture shows how the front of 173 looked in the '70s :
 |
| (These are the original owners of 173 - so happy to have this kind of provenance!) |
Changing Direction
I think 173 must have looked so airy and crisp back in the day! A far cry from the direction she was headed beginning in 1997. Back then, the front stoop was the same as in the picture above, and wasn't really a stoop at all; instead - just a few steep, narrow steps as you can see in this old grainy photo:
Then in '99 or so, I took down the old steps, and
built a stoop which ended up looking like this:
Not Too Bad for a Beginner
The stoop was a couple years old by the time that picture was taken, but you get a sense of what is had become. Then this happened:
I went and painted the railings white. Not a big deal you say? Well, that was the beginning of the significant exterior alterations that led to this:
Those Dirty Little Secrets
It looked so fresh and crisp, I loved it! But there's a dirty little secret...white hides a lotta sins - from a distance. The fact is, the railings were getting old. They had been stained with deck stain at least five or six times over the years, and the paint just wasn't holding anymore. Besides that, I had made a construction error when building the railings originally in that I hadn't chamfered the top edges, so rain and snow simply sat there. Once again, I didn't take a "before" photo up close, but this picture shows how the posts were beginning to get those splits that you just can't hide:
 |
| (Awkward shot taken from inside the porch, blown up and cropped.) |
So, it was time to re-do the railings. As is the case in almost every project at 173, I thought it over (overthought really) for weeks. It isn't quite finished yet, but last weekend the stoop looked like this:
I decided to do one side of the stoop at a time...hate the thought of the mailman walking right off the edge! The project is further along than that picture, but I'm reserving the rest for the final reveal, and with any luck, and the weather holds, we'll have railings in a few days!
New Front Stoop Railings - Part 2: Preparation - 9/24/17
In Part I of this series, I related a little about the history of the front stoop here at 173. While searching through the blog, I noticed that there has been a few posts about the stoop over the years, including the door being painted, the new house numbers, and adding "a little pop", all back in '13. There was also a post as part of the punch list from the front porch outside remodel, one about painting the steps in July, 2016. All of which just goes to show there really is no master plan happening here at 173!
This is where we left off last week:
Well, considerable progress has been made this week, but I'm not quite ready for the reveal of the new railings. But I did want to share some pictures about the prep work that went into this project. It all started with buying the lumber, and prepping it. The first stage of the prep was to let all the wood sit in the basement for weeks so the dehumidifier could help remove some of the moisture from the pressure-treated wood. I chiseled out the bigger knots in the wood and used
Dap Plastic Woodto fill them:
From there, I used my table saw to rip 1x4s to the width I needed, and also chamfered the other rails (which will make sense in the reveal).
Then the re-sawn 1x4s were run through the 'ol router (cheap but effective router table below):
...giving what would become the top of the top rail a bit of a profile:
And, while we're talking about routers - here's a shot of the router bit box I built of scrap wood 16 or 17 years ago:
After that, the workshop and basement became a painting assembly-line:
Experimenting with Pre-Sizing
I decided to cut the pieces of railing to size and pre-prime and pre-paint, and while I can see the merits of such an approach - it was a long, slow, tedious process! Here are a couple more shots of the assembly line:
Sheetrock Screws - Rookie Mistake
Okay, and one final shot for today. Way back when the
front stoop was first built, I didn't really realize sheetrock screws couldn't be used in pressure-treated lumber. Also, I wanted to make sure the post that had to be flush-mounted was fastened well and very stable. So what does one do? Use lots of screws!! Here's how they looked when I took apart the old railings/posts:
So, that's where we are. With any luck, when next we meet....
Front Stoop Railings Finished! - 10/3/17
Okay, just a couple touch-ups to do but I probably won't get back to posting about the front stoop again (other projects to move on to as time permits), so I'm posting just a tad early because I actually have a few minutes tonight.
Picking Back Up
We left off with the
dismantling of the old railings, and the prepwork - including wood filler, priming and painting prior to putting (holy cats that's a lotta P's!) the new railings together. Now I'll show a little of the progression. I showed you some of the painting:
Handrail Anatomy
Bear with me a second. What I wanted to do was incorporate all the primary colors of the house (not including the yellow doors) to give a little interest and dimension to the stoop. Here's what I did:
Because the lower rails would be 2x4, I started the top rail with a 2x3, topped by a 1x4 which I re-sawed to the width I wanted, then routed the edges. On the sides I applied trim moulding for that bit of dimension I was talking about. Once assembled this is what they looked like:
I painted the moulding Valspar's Elephant Gray
...which is one of the
primary colors here at 173. To get a touch of black involved, I painted the bands on the posts with Sherwin-Williams High Gloss Black:
Assembly Time
I'm not generally a fan of high gloss paint, but I picked this up at Lowes on the "mis-mix" shelf for about two bucks - who can pass that up? After what turned out to be weeks of prep, it was time to put it all together. Now, one would think that with all the prep, pre-cutting, etc, that assembly would be a cinch. Well, one would be wrong! You know, I did okay in high school geometry, and I watched numerous videos about figuring angles in construction, but in the end - I went with the most obvious approach:
Just clamped on a board left over from some long-forgotten project, scribed a line, and cut it on the chop saw!
Oh, and let me take a moment to tell you about the saw! That saw is just a basic chop saw, nothing fancy about it. But, because I'm so terrible at angles, I searched for, and found this awesome little gadget:
What a difference! Perfect alignment made my angled cuts spot-on! By-the-way, nobody paid me to say that, but if they'd like to....! Anyway, I digress. Once all the angles were figured, and cuts made, it was a matter of assembly. I decided to go with 3 rails to match
the back stoop, but this time, I chamfered the board to provide for rain runoff (the things you learn on YouTube!).
Using Kreg jigs and screws, trim screws and GRK structural screws (another product I loved!), the whole thing came together:
Then it was a matter of caulking, filling holes and sanding...
Followed by more painting (did I ever tell you I hate painting?), 'til it ended up looking like:
But, I had an idea a few weeks back, just one of those final touches I thought would add that little something extra:
Little solar lights! O vanity of vanities - I love the look!
Before I wrap up this post, let's have a quick look at the front stoop evolution...
Early '70s:
1990's:
Late '90s:
Early 2000's:
2016:
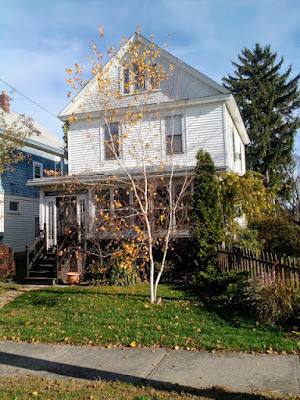
And now:
Concluding - Kinda
I say "Kinda" because like the rest of 173, the stoops are likely to be ever-changing. The're sure to change because of needed repairs, or keeping up with other changes, or because I simply have a hankerin' for something different! But for now, this is the proximal end of what is clearly a decades-long evolution of the front stoop!
Thanks for stopping by!

I've been following House 173 for quite a while now, and seeing all these front stoop projects in one place really surprised me. I remembered some of them, but I never realized how much the front of the house had changed over the years until I saw the pictures lined up like this. It doesn't feel like one big renovation, it feels like watching a neighbor slowly make a home a little nicer every few years.
What I enjoy most is that nothing here feels rushed or trendy. Every change seems to have a reason behind it, whether it's fixing something that bothered you, correcting an earlier mistake, or simply making the house a little more welcoming. By the end, I wasn't just looking at a front stoop, I was looking at the story of someone who has cared for the same old house for a very long time. That's what makes House 173 different from most DIY blogs. - The Neighbor
Frequently Asked Questions
Why did you build a front stoop instead of keeping the original steps?
The original steps were steep, had narrow treads, and never felt particularly welcoming. A full stoop made the entrance safer, more comfortable, and better suited to the character of the house.
Why does the front stoop keep changing?
Because old houses evolve. As other parts of the house changed, the stoop gradually changed with them.
Why paint the front door yellow?
The success of the yellow back door convinced me the front entrance deserved the same warmth and personality.
Why replace the railings?
Years of weather eventually caught up with them, and I wanted to correct a few mistakes I'd made the first time, especially the flat top rails that collected water.
Why use vinyl lattice instead of wood?
It fit the updated look of the stoop and should require far less maintenance over the years.
What's your favorite improvement?
Probably the new railings. They tied together everything that had changed on the exterior over the previous several years.
Is the front stoop finally finished?
Probably not. Like the rest of House 173, it's simply the latest version.
Keywords
front stoop renovation, front stoop makeover, DIY front steps, old house renovation, porch railings, yellow front door, Valspar Goldenrod, front entrance makeover, exterior remodeling, porch restoration, old house projects, curb appeal, House 173, stoop rebuild, front porch ideas