

Megapost
Made at 173
How a pair of temporary bookcases became a custom dining room built-in with shelves, a mantel, and the first Christmas fireplace at 173.
This is the first of the Megaposts here on House 173! What is a Megapost you ask? Well, when I'm doing a large, and sometimes not so large, project I end up posting the progress as I go. As it turns out, even with labeling, getting the whole story can be difficult.

So I decided that on the larger projects, I would create a post that culls together each of those posts to create a kind of metanarrative. and this is the first - the great dining room built-in of '17 - '18!
This Megapost follows the entire dining room built-in project from the first idea to the final reveal: removing the old bookcases, building the base, adding an electric fireplace, constructing the bookcases, running power, trimming the mantel, painting, glazing, staining the baseboards, and finally putting the room back together. If you're looking for a perfectly polished tutorial, this probably isn't it. But if you're interested in how a determined homeowner slowly figures out a custom built-in in an old house, welcome aboard.

11/5/17: I have the next project in sight! Work is crazy right now, the holidays loom, and I have to start back to school soon, but I thought - why not get involved in a rather extensive project right now. I guess if we wait for the ideal time, nothing would get done. Right now I'm in the planning stage, and if you know me at all - the planning stage can be pretty tedious. I started with picking up a couple tools I knew I'd need for this particular job. First, I got a random orbital sander.

I suppose if you're trying to guess the project - that didn't help much. Funny thing is, I have all kinds of sanders (nothing like my dad though - I swear he has two of every tool known to man!), but I never had a random orbital sander. From what I understand, these sanders don't leave some of the gouge patterns that palm sanders tend to leave. Anyway, here's another hint:

Okay, it's not the toolbox. Although, that's an old beat up box I've had for many years now, but it was rusting, and I was looking for something to do for half an hour, so I painted the thing. Plus, I was looking for a storage place for all the Kreg tools I seem to be collecting these past couple years. Also, I had some blue paint, so I thought that would go. I digress, so here is the latest tool acquisition, one directly targeted at the next project:

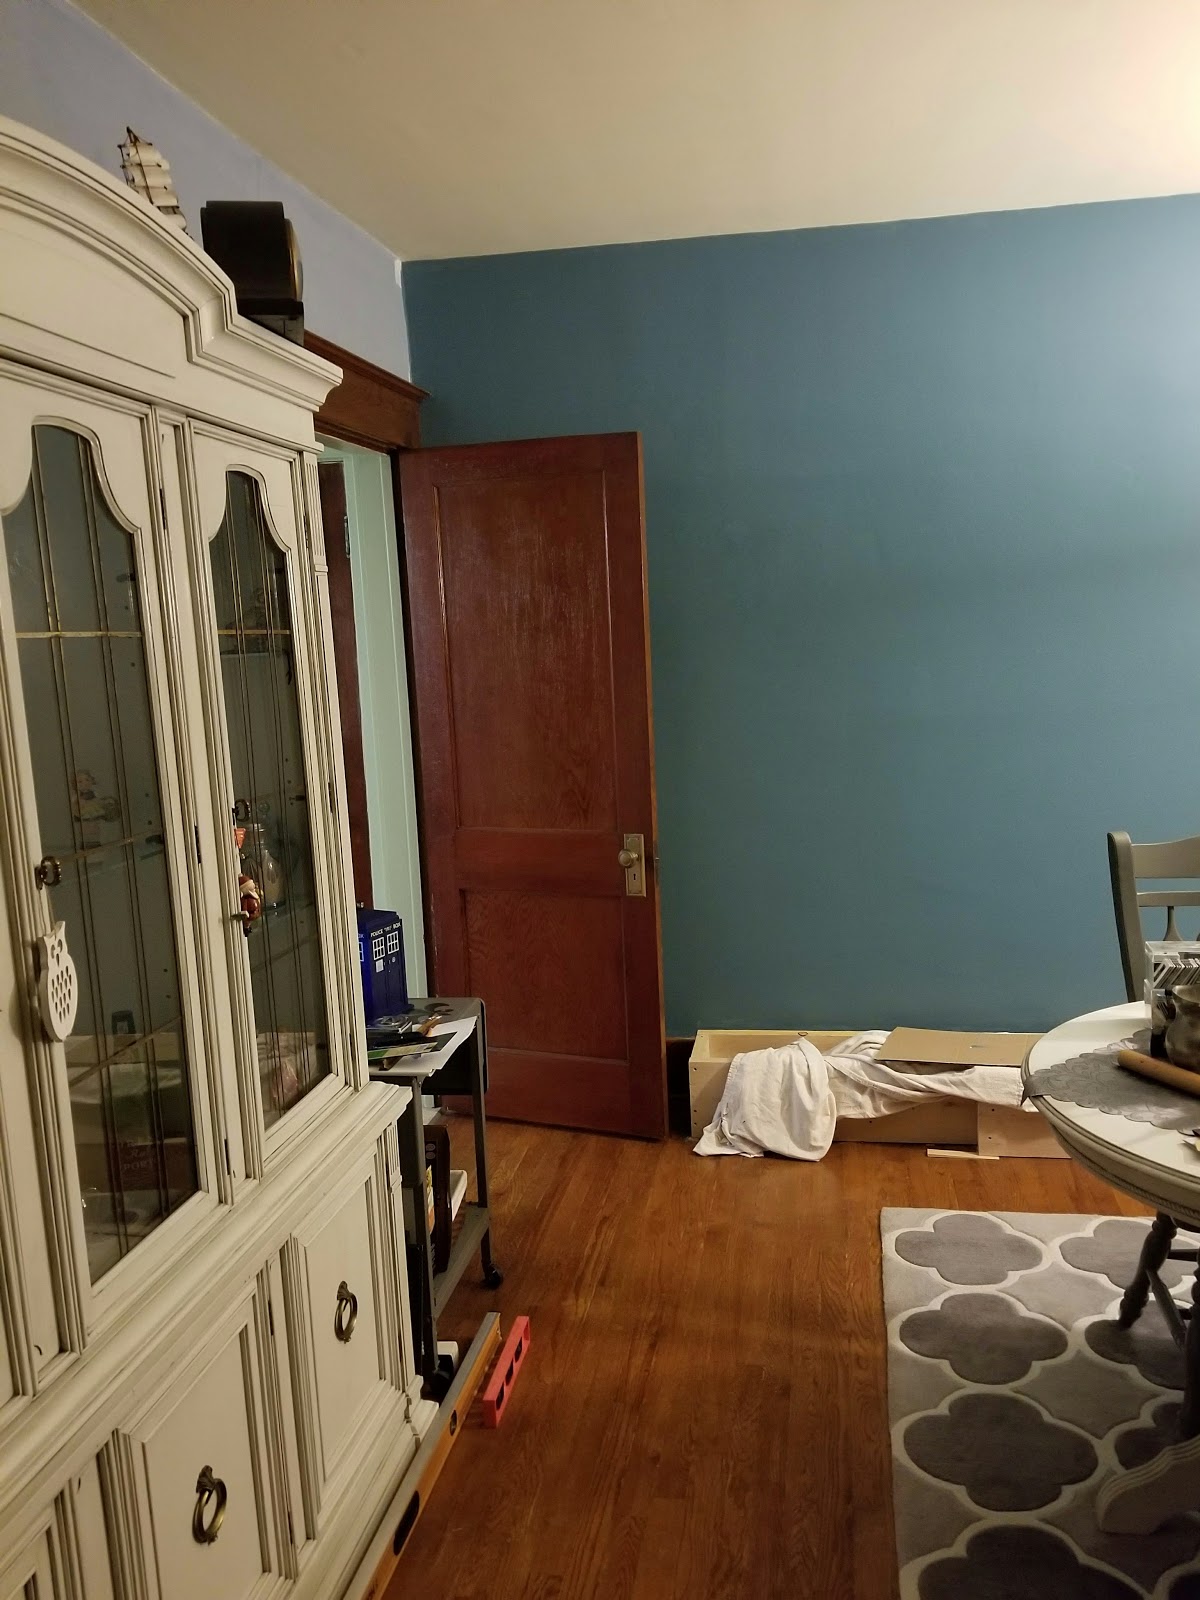
See it? It's the Kreg shelf-pin jig. A little better clue, but sufficiently vague I'm sure. So, cat out of the bag...I want to try my hand at a built-it here at 173! Here's what's in the space right now:

See the shelves in the dining room? Well, we've had them since 1994. They're the come-in-the-box type of shelves, and when we got them they were pretty nice for where we were financially, and considering the fact that we were apartment living. But lo, these many years later, they are really the last piece that keeps the dining room from being "finished".
SO, I have a plan, and here's a little sketch:

I realize it's a pretty amateurish rendering, but I had so many thoughts running through my mind I just had to sit down and draw it out. The plan is - an electric fireplace incorporated into hand-built bookshelves. Yep, that's the plan. With any luck at all it'll turn out at least close to what I see in my mind's eye. I have a feeling this will be a protracted project, but let's cross our fingers!

11/12/17: The last post I announced my intention for the next project here at 173, which turns out to be a built in fireplace/bookcase. I have an idea of what I want...


And that's not the half of it! Here's another shot:


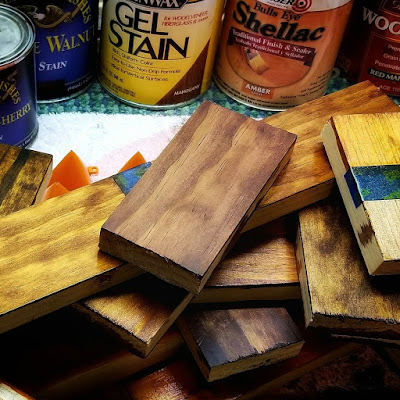
I'm liking that one. It's General Finishes' Antique Walnut:

... and I think I may be able to work with that one. Restyle Junkie has a nice post about using this stain, and some advice I need to consider! I was talking about this with a colleague at work, and she said something a bit profound...it's probably worse to try to get close and miss with matching a color than it is to simply choose a different color. Sage advice, I'm trying to keep that in mind!
BUT. I'm not 100% convinced I'm going to like that color on a larger scale than just a test board. So, in the back of my mind is the very real possibility that the whole thing may end up painted. I spent some time back in 2015 painting the dining room table, chairs and hutch, and I guess there's a real possibility the whole thing may be painted to match those pieces:

But that's all some time away yet...next up - prepwork!

11/21/17: It's weird..the things I find myself getting nostalgic about these days. For years I looked at the Sauder bookcases in the dining room as just what they were - inexpensive beginner furniture. But now - I find myself reflecting on all those shelves have seen. After all, they predated the purchase of 173. When we got them, they were actually a little more than we could afford. Having just left the military, entering college, and living in Horseheads (yes, you read that right), NY we were living check-to-check. But we have always been bibliophiles, and wanted some shelves the lend them a little dignity. I don't even remember where they were purchased, but they looked better than anything we had. And you know what? They really didn't look bad...


I saved the sides of the two tall bookcases, figure they're pretty solid MDF and I can use em around the workshop. And now, the dining room looks empty for the first time since '97:

And of course, the table is a storage spot for the time being...

Looks so sad right now...

So, now I'm committed...there's no turning back!


When you're working alone, it's always good to have hacks to make the work easier. Recently I saw a suggestion in Family Handyman magazine to use rigid foam insulation to support the boards when crosscutting. It worked like a charm! I used 2x10s for the base, and they're way too awkward to cut on sawhorses by yourself.


11/26/17: I think it was in 1998 that the dining room was first painted - and it's been the same color ever since. I don't know if that's a statement of the quality of paint, the steadfastness of not fixing it if it ain't broke, or - is it just a flat-out sad statement! Either way, it's changing!
Back in '98, the dining room was painted Missoula Blue by Dutch Boy...
It's been a nice color for the room, went well with the woodwork, and lent a very calming (if not cool) feel. After removing the old bookshelves, the fading showed, but it was remarkably little fade. I think you may be able to tell in this picture, look around the top two and right at the bottom of the lowest hole patches:

Not too shabby! I always thought Dutch Boy made really good paint, but I'd have to drive 75 miles one way to Springfield, Massachusetts to get it (isn't that where the Simpson's lived?).
Now, with the new built-in going up, it really was time for fresh paint. Oh the agony of picking a color. We've been all the way around the color wheel. Here are a couple finalists:

All four of those colors were considered at various times in the past year or two, pretty much since the great dining room furniture adventure of '15. Then there was...

'Cuz we were thinking blue has been a good color. And...

But it seemed too dark, so maybe lighter...

Somehow, that one didn't feel right, so maybe...

That's Sherwin WIlliams' Stonebriar. That came very close to being the new color, but we thought it might be a little too...something. But there was one color that caught our attention from the beginning, and kept lurking in the background, and in the end - it won out. Introducing....

The coordinating colors are similar to the furniture and in the family of the woodwork. It's a shade of blue - which seems to be our wont, and thought it would really make the room pop! Here's the first wall...
If you look in the upper left of the picture, you'll notice the contrast between the new St. Bart's and the good ol' Missoula Blue - kinda striking! At first it feels like it would be a bit dark, but when the built-in is finished, I think it'll look awesome! And finally, for my own future reference, St. Bart's was mixed at Lowes in satin:


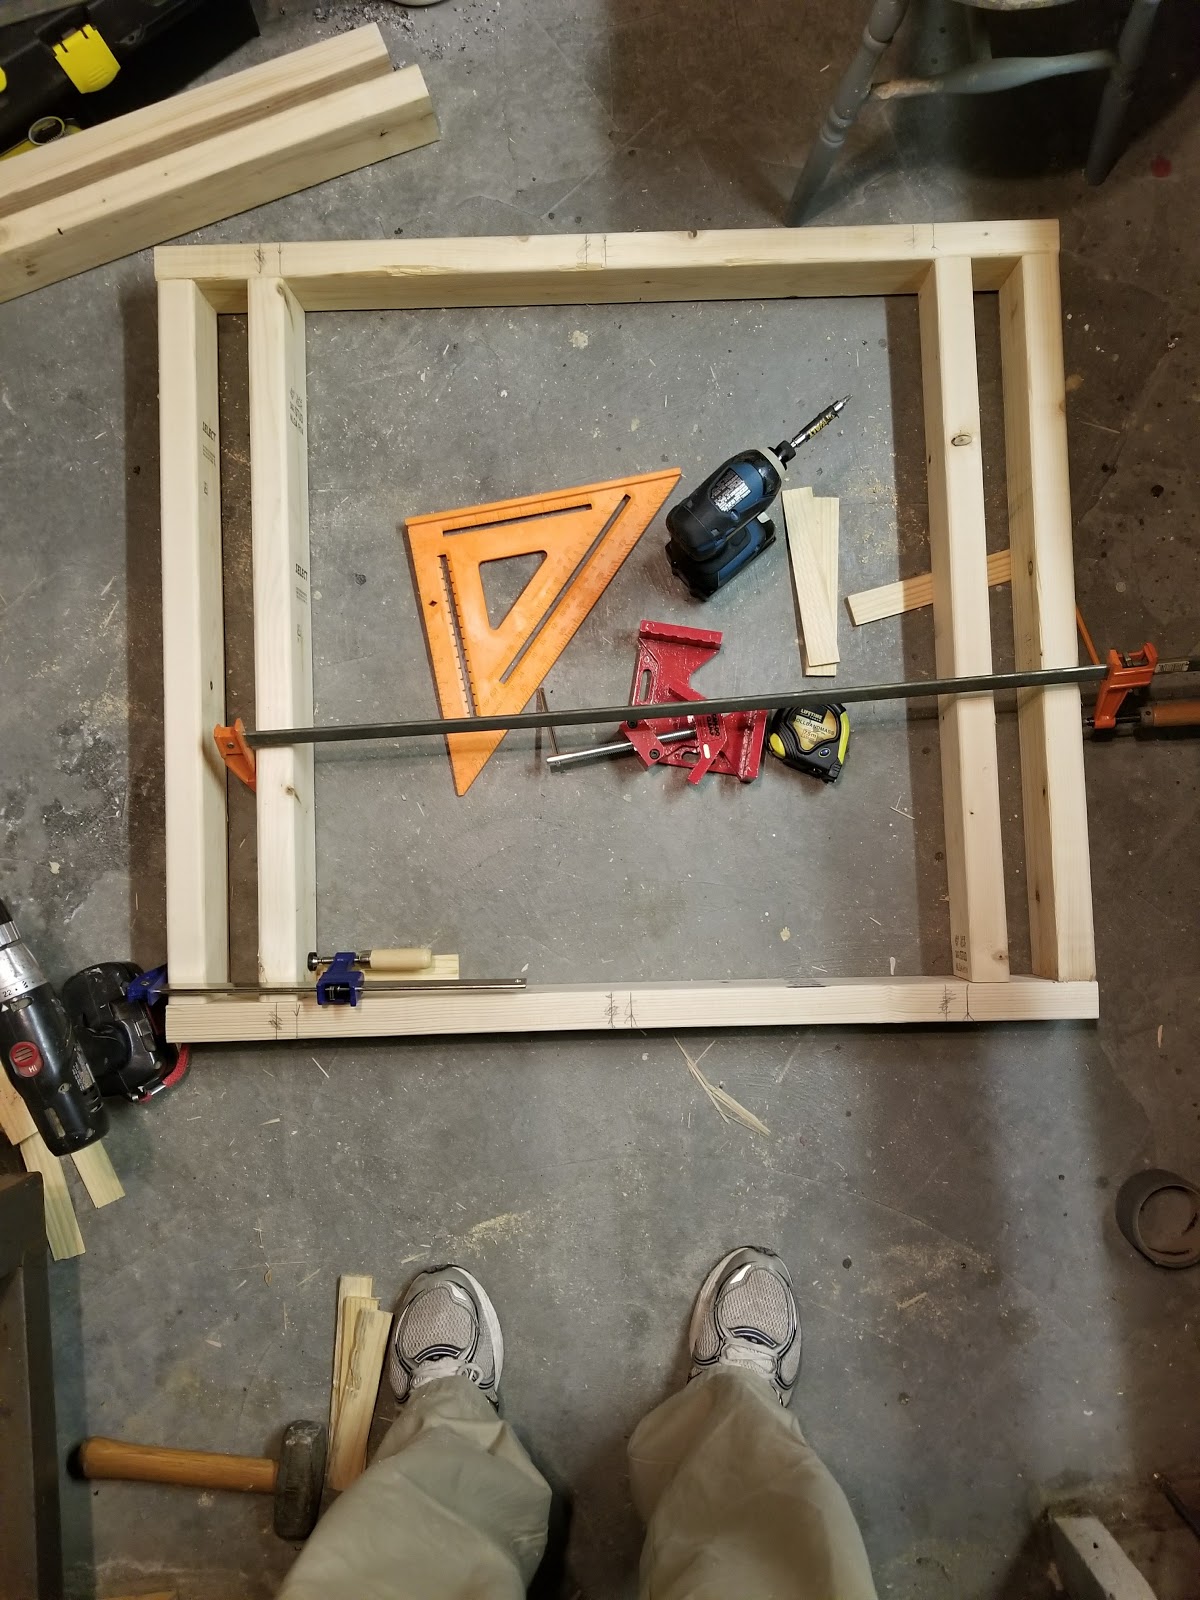
11/30/17: I keep thinking I want to wait until the whole project is finished before posting, but quite frankly - it's going to take too long, and sharing the progress is half the fun! The main reason this is taking so long is because I really don't have much time after work to monkey around with the built-in. Okay, you're onto me - the real reason it's taking awhile is that I'm not that skilled. Just putting a few boards together takes an incredibly long time...I measure, do the math, set up clamps, measure, do the math and set up clamps again!


Right now the front is just tacked to the rest of the carcass, there's a few things to do before it all gets permanently affixed. Tonight I got the based all leveled up, tomorrow I'll probably redo that long platform board (I mis-cut the one in the picture), then I want to get the power run up into the fireplace box. I already ran the wire from the circuit-breaker box to the spot in the workshop that's just below the dining room:

Once the platform is re-cut, I'll be able to drill the hole and set up the outlet. Seems like so many steps to go still!

12/3/17: The other day I wrote about how long this project is taking, mostly due to the fact that I'm far from a professional. This weekend is the perfect example of that. Yesterday I cut the new base platform because I had messed up the other original one, leveled the base and fed the power line up from the workshop.

And it all ended up looking like this...

Then today, I finished the assembly of the fireplace carcass, and got all the pieces cut for the first bookcase!

I'm sure the pros don't do it this way, but to get the sides to be exactly the same lengths, I clamped them together to cut them. Because of the tall base to the built-in, the bookcases will be 7 feet tall, taking the overall height to almost 8 feet! I also cut the top and bottom, as-well-as a center span to give the case more structural strength.

And I got started on the pocket holes too:

It's slow going for sure, but fun too! Hopefully the next post will have some obvious changes!

But today I made visible progress! The first bookcase is up! Almost a week ago I cut the parts for the case - almost a week ago! Well, I had a little time today, and it was a little tricky putting it together alone, but I had a great idea...I used a series of clamps and jigs (for lack of a better word):


And finally, here's the case in place...

And one last picture looking from the kitchen:


Here's what it looks like now:

And a shot looking in from the living room:

No, they're not crooked, I'm just not a very good photographer. I think the next step is to drill the shelf holes. Maybe I'll do a short post about that!?


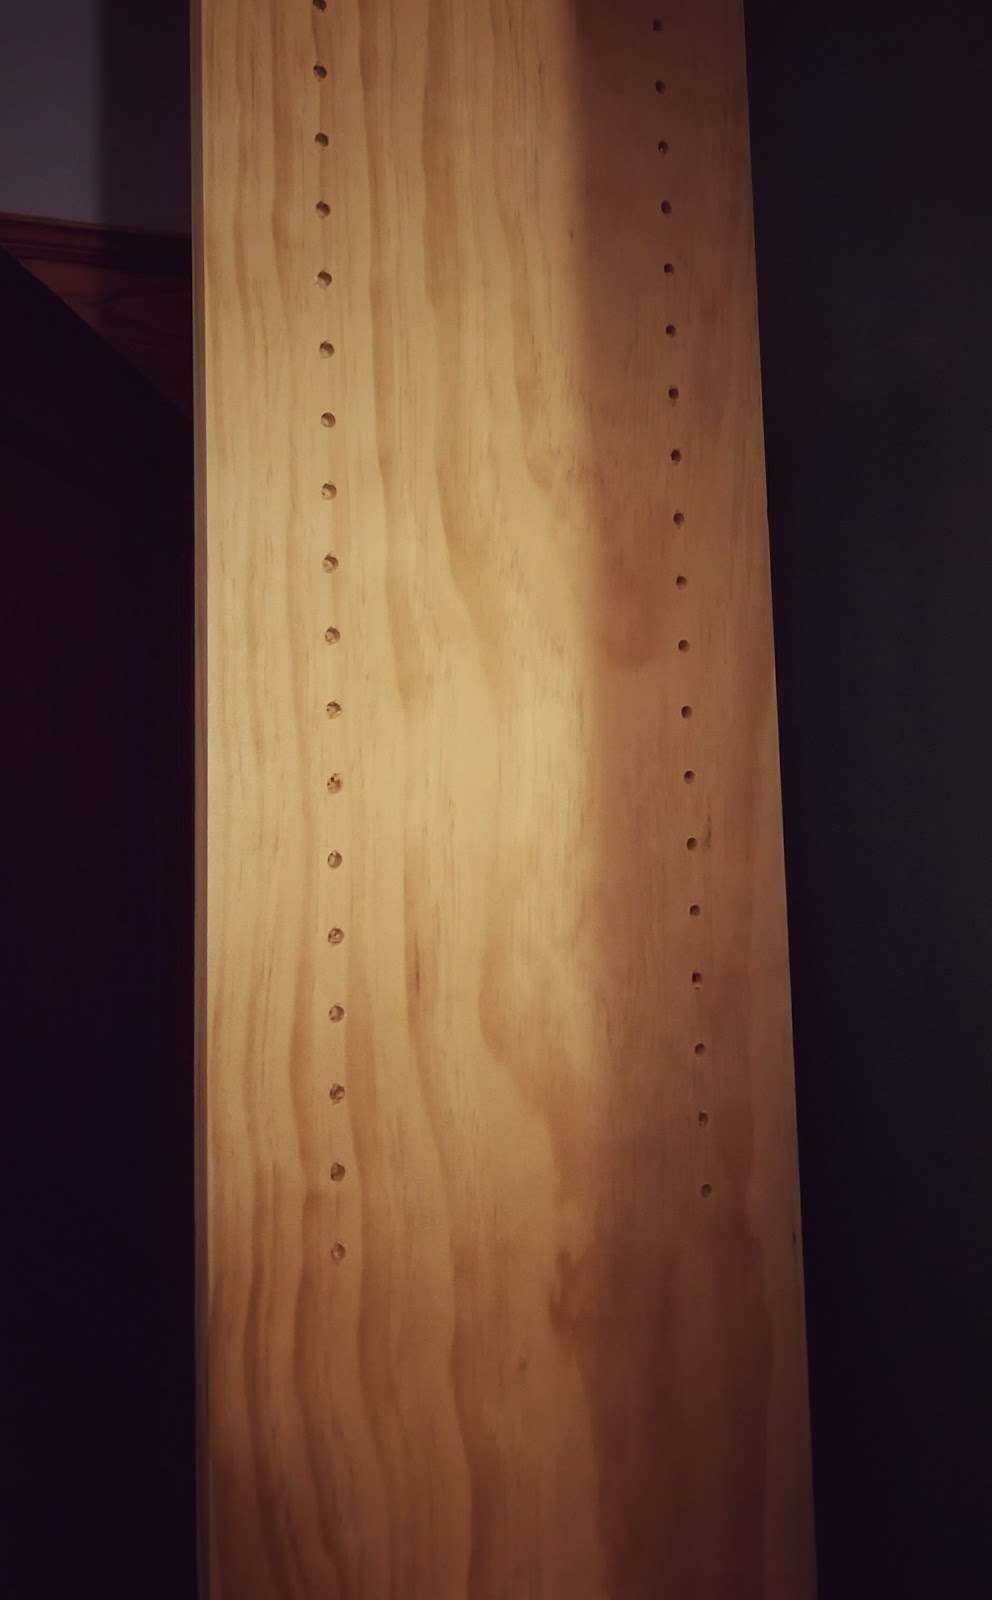
Now it's time to get going on the details! The first step was to drill the shelf-pin holes. I gotta say, the Kreg shelf-pin jig was awesome, and as simple to use as advertised!

I tried to get a picture of how the holes all lined up, but unlike my father, I'm not much of a photographer, and the holes look crooked in all the pictures, but I can tell you - they're straight and level as can be!
Once that was done, I got the face frame done. This part went surprisingly well with very little hassle. If you know me at all, you know that anything here at 173 that goes up easily is a rarity! But I took my time, and with the laser on my chop saw, got some pretty precise cuts. As a matter of fact, this is probably the loosest joint I had!

All-in-all I'm pretty happy with the way it turned out:

Oh! And there's the fireplace in it's future habitat! Very satisfying that after all the planning, measuring and assembling, the fireplace fit perfectly with maybe a quarter inch or so play all the way around! It kinda reminds me of when I was a kid. Dad tore off the entire front porch of the house and built a front entry-room to make it so the front door faced south instead of west, where the winter winds come from. I don't think he drew a single plan for that room, but he framed it up perfectly. So much so that when we put the big picture window in, it practically snapped into place with almost no shimming whatsoever!

See the double window on the right? That's the one - perfect fit! Anyway, by comparison, my tiny little electric fireplace fir perfectly! LOL. So, the next step back here at 173 was the tops for the bookcases. Here's a sneak peak:

I got started after work tonight, and finished the front for ONE of the bookcases. Yeah, a couple hours on just the front of one! I've never been great at mitering, so I'm really taking my time with this. Obviously - more to come!


The first step was to get the facing legs on.


Kinda hard to see there, let's try another shot:

Look familiar? It's the same profile I put on the tops of the front stoop railings this past summer! Nothing like consistency! Here they are installed:

And from straight on:


I put together a pretty hefty shelf:


Then I put a desk hole grommet in...

Yep! Already have something plugged in! One thing I think I want to do though, is recess the grommet so it doesn't sit on top of the shelf. Anyway, that brings me to the next step, actually hooking up the power. The receptacle end was no problem whatsoever:

The complicated part was actually supplying power to the outlet. Pretty obvious huh? The choice was to find a line somewhere and tap into that, or hook right into the circuit-breaker box. 173 has a solid electrical setup, but the lines are all over the place...there doesn't seem to be any rhyme or reason to what's connected together, therefore I decided on the circuit-breaker box.
Over the years in this blog, I have bemoaned my dislike of painting. Well, there is one thing I hate even more than painting, and that's messing around with the circuit-breaker box.

Ugh! Makes me shiver just thinking about it! I've put new lines in before, but that was years ago when I put new power in the third floor. Thankfully, putting the new line in went off without a hitch, but it was nerve-wracking even though the main switch was off, and I used three different electrical testers to make sure! That said, with the electricity set, and the mantel shelf built, it was time to put the trim on.
For the trim, I used this, from Lowes:

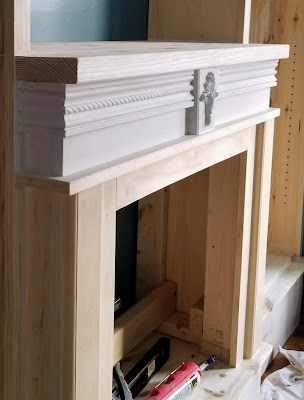
The idea was that there are some lines, curves and that rope look, all of which will hearken to both the hutch and the dining room table! That's my hope anyway! But the thing is, I bought two 8 foot lengths of the trim, and when I made the book case tops, I didn't think through the cuts and ended up without a piece to go the full length of the fireplace. But I had two pieces that would go more than half way, so I had an idea - a plinth block!

I've seen plinths on fireplaces in movies (yeah, I pay attention to such things), so I figured I was safe and it wouldn't look horrible (at the same time saving me another $20). Then it was a matter of inserting the fireplace and seeing how it all comes together!

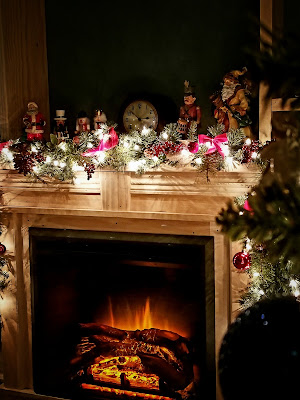
And there it is! There's still a lot to do, but I'm done 'til after Christmas, I want to decorate it a little for a couple days! Then there will be filling nail holes, caulking, priming, painting - not to mention making shelves for the bookcases! But for now...

Merry Christmas and Happy Holidays everyone!

12/31/17: Happy New Year! I hope everyone had as wonderful a Christmas as I did! With Christmas on a Monday, there was actually time to spend Christmas Eve with my mom, dad and two of my siblings! I can't remember the last time that happened! It was so much fun I think there should be a law...let's make Christmas the last Monday of December rather than the 25th! Whomever makes that happen gets my vote!
Like probably most of us, I love Christmas! So much so that 2 of my top 5 favorite movies are It's a Wonderful Life, and The Bishop's Wife. One thing I've always wanted was a fireplace, and a great mantel to go with it, one that could be dressed up for Christmas...you know - another attempt to create an atmosphere that conjures those Christmases of my idyllic youth. Watching Bing Crosby and Andy Williams Christmas specials, and all those old movies always had a fireplace. That's part of the reason I was pushing to get as much done with the project as I could before the holidays. And it worked!
This is quite possibly the first Christmas mantel here at 173! I say possibly because there is some evidence that there may have been some form of fireplace here in what appears to be the 1940s or '50s:

So here we are in 2017, and this much I can say with absolute certainty - 173 has my very first Christmas mantel! A couple days before Christmas, I finished enough of the project to stop and put some things on the mantel.


There you have it - a peek at the Christmas mantel! Happy New Year everyone!


1/5/18: Maybe it's an attention span thing, or just a need for immediate gratification, or just sheer excitement over the thought of seeing this project complete, but whatever it is - this stage of any project is tedious. It's the really fine details...filling nail holes, and sanding them. And speaking of sanding - this is tedious sanding! And sanding, and sanding.

I have big ol' sausage fingers, so filling a tiny nail hole near all these grooves invariably ends up with wood filler in very inconvenient spots, spots very difficult for these old tree branches to get into, even with tiny strips of sandpaper! I'm also sanding to round over all the edges on all these boards - tedious!

I also filled nail holes, sanded, caulked and primes the crowns for the bookcases. I think they're going to turn out pretty good. Then there was the electrical access grommet...

It's already been useful, but I rethought it a little, and decided the grommet really needed to be recessed. I'm telling you, it seems like I've used every tool in my workshop for this project, and this was a task for a tool I've actually used very few times, my drill press circle cutter...

I think this is the scariest tool I own, even scarier than the old table saw of death! I started recessing the hole with that tool on my drill press, but the mantel shelf was just too awkward, so I ended up just using my chisel. Took a little longer, but it worked out fine.

I also got started on - you guessed it - filling nail holes, sanding and priming the removable shelves:

And that's it...subarctic temps this weekend will probably keep me in the house, so who knows how much will get done! Of course there's still more sanding to do............


1/10/18: In the last post I mentioned all the sanding that had been done, and all the sanding I still had to do. Well, the sanding is done! However, the tedious stuff is still not done - now comes all the prep work...caulking, priming and re-priming. Before I could start caulking though, I had to soften the sharp edges of the all the wood. Here's a shot pre-caulk...

After a good cleaning, I got started on the caulking. For most people this would probably take no time at all, but I'd say I spent a good 5 or 6 hours caulking! But when it was done, the whole project began to look like something! Here's my favorite post-caulk picture:

I love how it's starting to look like a real piece and not just a bunch of boards glued and nailed together! I'm giving the whole built-in two coats of primer because there's a few knots here and there and I hate bleed-through! When I did the dining room table and the hutch, I used Zinsser's Bulls Eye 1-2-3 primer. It worked pretty good so I figure I'll stick with what works. Here's just a piece primed:

And the whole fireplace surround primed:

There's still a long way to go, but I'm still just taking my time!


1/15/18: The painting is done! Well, not done done, but kinda done. All that's left is the base:

I don't know what my hesitation has been with the base, but the fact is, it's time to just get to it. In the meantime though - the rest of the painting is done!

There's a couple more steps to go still, and believe-it-or-not, they're slow, tedious steps. I say that because this project is already at the 8-week mark!

And a final shot for today:

With what I have planned, that applique will really stand out! The whole project will get the same treatment as the dining room table,

the hutch...

and the plant stand!

Getting anxious to see the final product!!

1/22/18: Last week, painting of the built-in was completed, except for the base.


The other night I primed and painted the base, with the next step - glazing. As I mentioned last week, the dining room table, hutch and a plant stand were all painted with Valspar's Polar Star (using Behr paint - one of those oddities of convenience), then glazed with Valspar's Antiquing Glaze.

But you know what? I only had half a bottle of the Valspar glaze, and it turns out Lowes discontinued that line, and replaced it with a different glaze. On reading the reviews, it seems the new glaze tended to have a brownish look to it, and with everything else in the dining room having a blackish glaze - well, you know. So the search was on! I tried Home Depot, but the lady there said they didn't carry glaze anymore, and suggested I go to a craft store. I dunno, that was a little off-putting, as in my mind's eye I pictured little bottles of glaze to put on little ceramic projects. This built-in is anything but little! So, after reading lots of reviews on Amazon about a number of glazes, I settled on General Finishes Pitch Black.

Turns out, I'm glad I found this glaze! After a little practice it was really easy to use...the key there is practice! This stuff dries very fast, so much so that I almost messed up badly! I tried to cover too large an area, and had to work like crazy with some very wet rags to salvage the job! After I got the feel for it though, it went on nice, and looked great! Here's a shot:

I'll save other pictures for later. I love the way the glaze helps highlights some of the architectural details and adds depth to the whole project. The next step is to install baseboards around the base - this thing is almost done!!


1/28/18: I really hoped this post would be the grand reveal, the final post in what seems an endless stream about one single project. That just didn't pan out. Yesterday, the paint on the bookcases had cured enough that I felt comfortable putting books and stuff on them. The plan was to do that, then finish the baseboards. But...once again my body reminded me I'm not as young as I once was. Carrying big boxes of books (there's a lesson there - when packing books, use small boxes!), my back gave out - remnants of an old injury. Nonetheless, some work got done, and here's a couple pictures!

That's Gramma's clock on the mantel - one of my cherished possessions!

So that's it for now. With any luck, this project will be in the bag by the end of the week! That means maybe two last posts to come. I've done post each step of the way, so that means there'll probably be one about the baseboards, and then - finally - the grand reveal post! Hang in there friends!

2/2/18: 173 is an interesting mix of architectural styles. The city tax records show the house as "Old Style" which, when I Google it, shows pictures that are nothing like 173:

Years ago, I sent a picture to someone's blog (I wish I could remember which one) and asked people's thoughts about what kind of house 173 is. The most frequent answer as Folk Victorian. Which, I suppose is as good an answer as any. Here's an exterior shot:

Boy, I'm straying from the point! The point is, one of the architectural flavors of 173 is a kind of Mission-style baseboards. They're a full 7 1/2 inches tall! Here's a shot from a couple years ago, when the dining room was getting its hutch...

With that in mind, and wanting the built-in trim to match up with the rest of the trim, I put in baseboards that will match, if nothing else - at least in size and style.

That's just dry-fitted, obviously there was some sanding still to do. To make the 1x8s match up, I had to round-over the top edge. Of course I didn't have a small enough round-over bit for the router, so I ordered a set...

Turns out it's a good thing I got a 3-bit set, because I thought the round-over was 1/2", but turned out to be 1/4". Another chance to use my router and my home-made feather boards, which I made on the cheap and without much precision!

You may be wondering why I'm putting such inconsequential points in this post. I'll tell you why - this blog is important in helping me catalog the various products and techniques used here at 173, just in case I have to re-do something! That brings me to the next point. Ever since starting this project, I've been trying to find a stain combination that would match the colors already on the trim throughout the house.

Well....I haven't figured it out. A friend suggested that if I couldn't match it, it would be better to go with a shade totally different that to be close but not quite. I settled on a mix of two stains... 4 parts General Finishes Antique Walnut to 2 parts Georgian Cherry.

I gotta say this too...after using some pre-stain wood conditioner, the stain I used worked beautifully. This was my first time using a gel stain, and I gotta say - I'll never go back to penetrating stain. This stuff applied and wiped easily and evenly, although I had to be sure to work fast! Anyway, it's not a perfect match, but it's in the same color family, so it doesn't look terrible next to the old trim, and I really like the color result!

So, all that's left is a couple coats of amber shellac, and the project will finally be complete! With any luck, the next post will be the final reveal!

2/5/18: Done. Finally. Here we are, Super Bowl Sunday...February 4th, and the built-in is finally done! Theoretically, this project started (in my mind) many years ago because I always wanted something like this in the dining room. But in reality, on October 25th the dining room looked like this:

Here's a few of my favorite progress pictures during the course of the project. Even before the old bookcases were down, I was already experimenting with stain colors. Throughout the course of the project I was concerned about being able to match the woodwork that's so beautiful here at 173.

Of course, one of the really fun parts of a project like this is getting to use my tools. Well, this was one of those projects that I used almost every tool I owned, with the exception of plumbing tools I suppose!

I learned a lot of lessons throughout this project too. I had to watch videos, read articles, and practice on scrap pieces to get things as precise as I could. This picture is one of those. Even after all that, it wasn't perfect but I was really happy with this little, tiny piece of wood:

Then, 173 had its first Christmas mantel!

The caps to the bookcases were troublesome. Several layers, angles, mitering...

And there were some good ideas, like access to the outlet through the mantel, and recessing it into the top of the mantel:

And I was tickled when the sanding, softening the edges and caulking were all done!

Then came the priming, painting and antiquing. Never my favorite part of a project, but it was really coming together!

Finally, it came down to the baseboards. Like I said earlier, I stressed throughout this project on trying to match the color of the woodwork at 173, and tested dozens of color combinations. At long last I came to a formula that is a relatively close match!

Hard to tell in that picture but, close! So now, without further ado...


And there we have it! At long last...almost four months later...but I'm quite tickled with how it turned out! Thank you all for bearing with me, post after post!
No idea what the next project is but...see you soon!
George
This one felt like watching a room grow up.I loved that the old Sauder bookcases got their moment before leaving the stage. They may have been temporary furniture, but after twenty-five years, they had earned a little respect. That kind of detail is why this post feels personal instead of just practical.The Christmas mantel section was my favorite. After all the measuring, sanding, caulking, staining, painting, and second-guessing, suddenly the project became about something bigger: giving 173 a fireplace moment it had maybe been waiting for all along.By the final reveal, the built-in doesn't feel newly installed. It feels like the room finally remembered what it wanted to be. - The Nostalgic Reader
Frequently Asked Questions
How long did the dining room built-in take?
The project took almost four months from the first planning stages to the final reveal.
What did the built-in include?
The finished project included two tall bookcases, an electric fireplace, a custom mantel, trim details, shelving, electrical access, painted and glazed surfaces, and stained baseboards.
Why use an electric fireplace?
An electric fireplace gave the dining room the look and atmosphere of a fireplace without requiring a chimney, gas line, or major structural changes.
Why paint the built-in instead of staining it?
The original goal was to match the existing woodwork, but matching old stain proved difficult. Painting helped the built-in coordinate with the dining room furniture while avoiding a near-match that might look wrong.
What was the hardest part of the project?
The most difficult parts were likely the planning, trim details, stain testing, sanding, caulking, and figuring out how to make everything fit an old house that was not perfectly simple or square.
What makes this a Megapost?
This post gathers many smaller progress posts into one complete project story so readers can follow the entire built-in from idea to finished room.
Keywords
DIY built-in bookcases, dining room built-in, electric fireplace built-in, built-in bookshelves, fireplace mantel, custom bookcases, painted built-ins, DIY fireplace surround, House 173, old house dining room, built-in shelving